How to Remove Popcorn Ceiling Safely and Easily
Learn how to remove popcorn ceiling safely and easily with step-by-step instructions, essential tools, and expert tips for a smooth finish.
Oh boy, popcorn ceilings! Just mentioning them probably makes you look up at your own ceiling with a mix of frustration and determination. These bumpy, textured ceilings that were all the rage from the 1950s through the 1980s now feel about as stylish as shag carpeting and wood paneling. If you're ready to say goodbye to that cottage cheese-looking surface overhead, you've come to the right place.
Walking into a room with popcorn ceilings is like stepping back in time, and not in a good way! They collect dust like nobody's business, make rooms feel dated, and can even harbor some not-so-pleasant surprises like asbestos in older homes. But here's the thing: learning how to remove popcorn ceiling safely and easily isn't rocket science. With the right approach, tools, and a healthy dose of patience, you can transform your ceilings from textured nightmares to smooth, modern surfaces that'll make your whole space feel fresh and updated.
Before you grab a ladder and start scraping away like there's no tomorrow, let me share something important. This project, while totally doable for most DIYers, requires careful planning and the right safety measures. We're not just talking about making your ceiling pretty; we're talking about doing it without turning your living room into a disaster zone or, more importantly, without putting your health at risk.
Understanding Popcorn Ceilings and Safety Concerns
What Exactly Is Popcorn Ceiling?
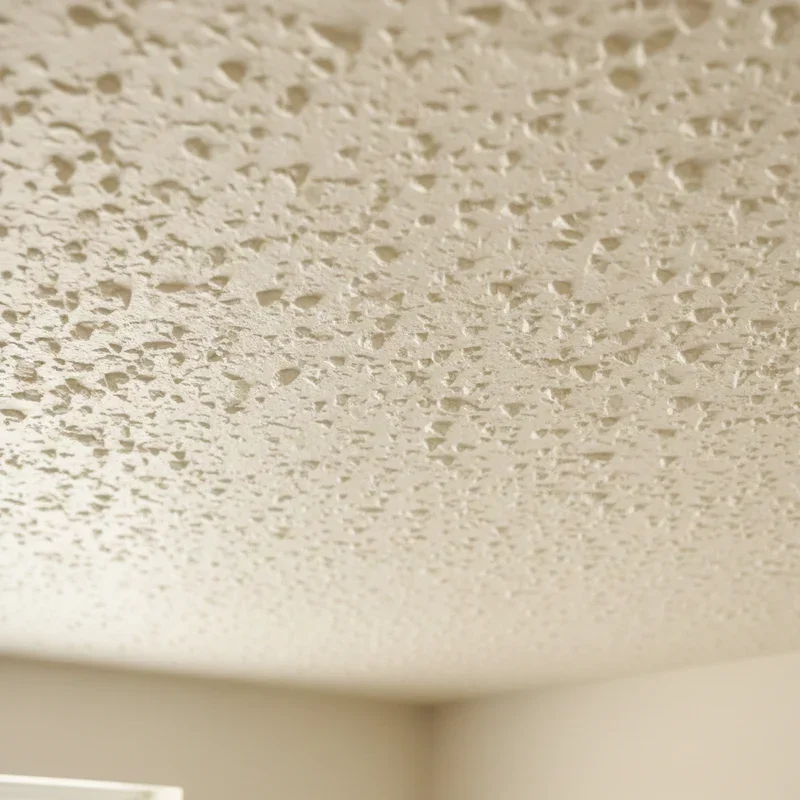
Let's get down to brass tacks and understand what we're dealing with here. Popcorn ceiling, also charmingly known as acoustic ceiling, cottage cheese ceiling, or stippled ceiling, is a spray-on or paint-on ceiling treatment that was used to cover up imperfections and provide sound dampening. The texture consists of particles of Styrofoam or vermiculite mixed with a binding compound, creating that distinctive bumpy appearance.
Back in the day, contractors loved this stuff because it was quick to apply and hid a multitude of sins. Got uneven drywall? Spray on some popcorn texture! Visible joints and nail pops? Popcorn ceiling to the rescue! It was basically the concealer makeup of the construction world.
The Asbestos Factor
Alright, here comes the serious part that you absolutely can't skip. If your home was built before 1980, there's a chance your popcorn ceiling contains asbestos. Yeah, that same material that's now banned because it can cause serious health problems when its fibers become airborne.
Between the 1950s and 1970s, asbestos was commonly mixed into popcorn ceiling texture for its fire-resistant properties. The Clean Air Act of 1978 banned its use, but suppliers were allowed to use up existing inventory, so some homes built in the early 1980s might still have asbestos-containing popcorn ceilings.
Before you even think about disturbing that ceiling, you need to test for asbestos. This isn't negotiable, folks! You can buy DIY test kits for about $30-50, or hire a professional for $200-400. Considering the health risks, this is money well spent. If asbestos is present, stop right there and call in licensed asbestos abatement professionals. Trust me, this isn't the place to be a hero.
Other Health and Safety Considerations
Even if your ceiling is asbestos-free, there are still safety concerns to address. The texture material can contain crystalline silica, which isn't great for your lungs. Plus, decades of dust, possible mold spores, and who knows what else have settled into those nooks and crannies.
Lead paint is another potential hazard in older homes. If your ceiling was painted after being textured, and that paint contains lead, you've got another layer of complexity to deal with. A lead paint test kit costs about $10-20 and can save you from a world of trouble.
Essential Tools and Materials
Safety Equipment You Can't Skip
When learning how to remove popcorn ceiling safely and easily, the "safely" part starts with proper protective gear. This isn't the time to tough it out in your regular clothes!
Here's your safety equipment shopping list:
N95 or P100 respirator mask (not just a dust mask!)
Safety goggles (the sealed kind that fully protect your eyes)
Disposable coveralls or old clothes you can throw away
Rubber gloves
Shoe covers or old shoes you don't mind trashing
Plastic sheeting (lots of it, at least 3-mil thickness)
Duct tape or painter's tape
Scraping and Removal Tools
Now for the fun stuff, the tools that'll actually get that popcorn off your ceiling:
Pump sprayer or garden sprayer (for wetting the ceiling)
Wide putty knife or drywall knife (6-inch minimum, 10-inch is better)
Ladder or scaffolding (depending on ceiling height)
Drop cloths (canvas works better than plastic for the floor)
Scraper attachment for shop vac (optional but super helpful)
Pole scraper (saves your arms and neck)
Bucket or trash bags for debris
Spray bottles for spot wetting
Finishing Tools and Materials
Once that popcorn is gone, you'll need supplies to make your ceiling look amazing:
Drywall compound (premixed is easier for beginners)
Drywall tape (for any cracks or seams)
Sandpaper (120 and 220 grit)
Sanding pole or sanding block
Primer (specifically for ceilings)
Paint roller with extension pole
Quality ceiling paint
Preparation Steps for How to Remove Popcorn Ceiling Safely and Easily
Room Preparation
Here's where the real work begins, and honestly, proper prep is half the battle! Think of this like preparing for surgery; you want everything clean, covered, and ready to go.
First things first, empty the room completely if possible. I know it's a pain, but trust me, it's easier than trying to clean popcorn texture out of your grandmother's antique armchair. If you absolutely can't remove large furniture, move it to the center of the room and cover it with plastic sheeting, sealing all edges with tape.
Remove everything from the walls including pictures, shelves, and outlet covers. Turn off the electricity to the room at the breaker box. You'll be spraying water up there, and water plus electricity equals a very bad day!
Protecting Your Space
Now comes the plastic fantastic phase! Cover the floors with canvas drop cloths first (they'll absorb water and won't be as slippery as plastic), then add plastic sheeting on top. Run plastic sheeting up the walls about 2-3 feet and tape it securely. This creates a bathtub effect that'll contain the mess.
Don't forget about doorways! Hang plastic sheeting over them to prevent dust from spreading to other rooms. If you have forced-air heating or cooling, cover the vents and turn off the system while you work.
Pro tip: Create a "decontamination zone" near your work area where you can remove dirty clothes and shoes before leaving the room. Place a trash bag here for disposable items and have clean clothes ready for when you're done.
The Removal Process
Testing a Small Area First
Before going full steam ahead, always test a small, inconspicuous area first. Pick a closet ceiling or corner that won't be noticeable if things don't go perfectly. This test run helps you figure out how wet the texture needs to be and how easily it comes off.
Spray about a 2-foot square area with warm water and let it soak for 10-15 minutes. The texture should look saturated but not dripping. Try scraping gently with your putty knife at about a 30-degree angle. If the texture comes off easily in sheets, you're golden! If it's still hard and crumbly, it needs more water. If it's turned to mush and making a huge mess, you've used too much water.
The Wet Scraping Method
This is the most common and effective method for how to remove popcorn ceiling safely and easily. Working in small sections (about 4x4 feet), spray the ceiling with warm water. Some folks add a tablespoon of dish soap per gallon of water, claiming it helps the texture release better.
Let the water soak in for 10-15 minutes. You'll know it's ready when the texture looks darker and slightly droopy. Using your scraper at a low angle, gently push forward and watch the popcorn slide right off. It's oddly satisfying, like peeling a sunburn (but way less painful!).
Keep a trash bag or bucket nearby to dump the scraped material immediately. Don't let it pile up on your drop cloths; wet popcorn texture is heavy and messy. Work systematically across the room, overlapping your sections slightly to ensure you don't miss spots.
The Dry Scraping Method
Sometimes, particularly with painted popcorn ceilings, the wet method doesn't work well. The paint creates a barrier that prevents water from penetrating the texture. In these cases, dry scraping might be your only option, though it's dustier and more labor-intensive.
If you must dry scrape, ventilation becomes crucial. Open windows, use fans to create airflow (exhausting air outside), and consider renting an air scrubber. Your respirator mask is absolutely essential here, no exceptions!
Use a pole scraper or attach your putty knife to an extension pole to save your neck and shoulders. Work in small sections, applying steady pressure but not so much that you gouge the drywall underneath. This method creates a lot of dust, so frequent cleanup is necessary.
Dealing with Painted Popcorn Ceiling
Why Painted Popcorn Is More Challenging
Ugh, painted popcorn ceiling is like the final boss in a video game! The paint seals the texture, making it resistant to water and much harder to remove. Sometimes previous homeowners painted over popcorn ceiling thinking it would "freshen it up," not realizing they were creating a future nightmare for someone else (probably you).
If water beads up on your ceiling instead of soaking in, you're dealing with painted popcorn. This changes your game plan significantly. You might need to score the surface with a scoring tool (similar to what's used for wallpaper removal) to allow water to penetrate, or resort to dry scraping.
Chemical Strippers Option
When water won't work, chemical strippers designed for textured ceilings can be a lifesaver. These products are gel-like and cling to the ceiling, breaking down both paint and texture. They're messy and require excellent ventilation, but they can tackle stubborn painted popcorn that won't budge otherwise.
Apply the stripper according to manufacturer instructions (usually with a roller or brush), let it work its magic for the specified time, then scrape away the softened mess. You'll likely need multiple applications, and the cost adds up quickly, but sometimes it's the only viable option short of covering the whole ceiling with new drywall.
Post-Removal Ceiling Repair
Assessing and Repairing Damage
With the popcorn gone, you'll finally see what's been hiding underneath, and honestly, it might not be pretty! Expect to find nail pops, cracks, uneven joints, and possibly some gouges from your scraping efforts. Don't worry; this is totally normal and fixable.
Start by checking for any loose drywall tape at the joints. If you find any, peel it off and retape those sections. Use setting-type joint compound for the first coat on repairs; it dries harder and shrinks less than regular compound.
Fill nail holes and small gouges with lightweight spackling compound. For larger repairs, use mesh tape and joint compound, building up thin layers rather than trying to fill everything in one go. Patience is key here; rushing this step will show in your final result.
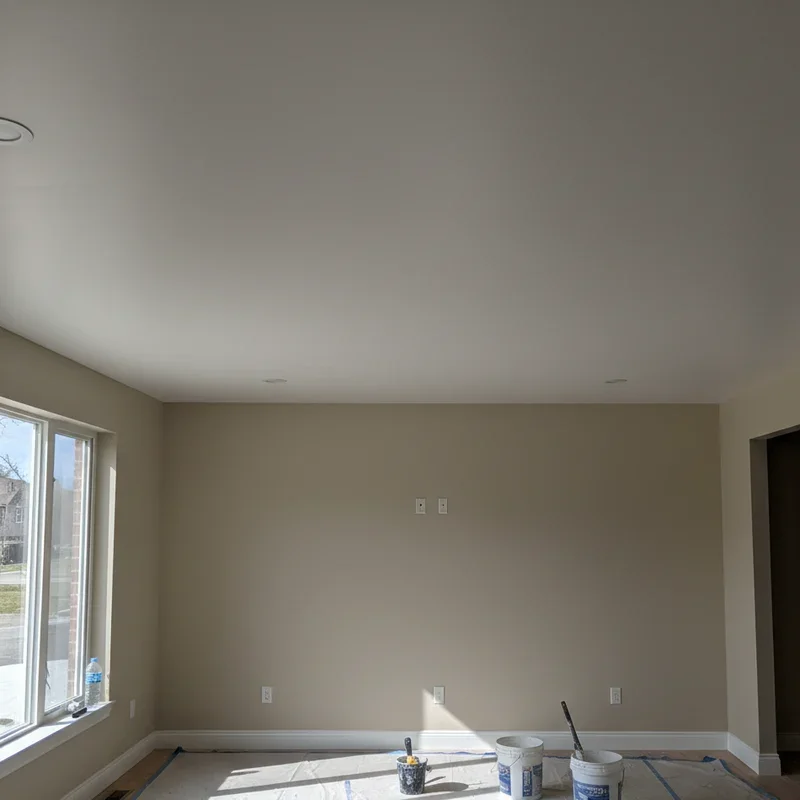
Smoothing and Sanding
Once your repairs are dry (usually 24 hours), it's sanding time! This is dusty work, so mask up again and consider using a sanding screen instead of regular sandpaper; it doesn't clog as quickly.
Start with 120-grit to level out the repairs, then finish with 220-grit for a smooth surface. Use a bright light held at an angle to spot imperfections; what looks smooth in regular lighting might show every bump and ridge once painted.
Don't sand too aggressively, especially over the paper face of the drywall. If you see brown paper or fuzzy areas, you've gone too far and will need to seal those spots with primer before applying more compound.
How to Remove Popcorn Ceiling Safely and Easily: Alternative Methods
Covering Over Instead of Removing
Sometimes the smartest move is not to remove the popcorn at all! If your ceiling contains asbestos, is in really bad shape, or you just want a faster solution, covering over it might be your best bet.
You can install new drywall directly over the popcorn ceiling, either by screwing through to the joists or using adhesive. This method is faster and less messy than removal, though you'll lose about half an inch of ceiling height. Quarter-inch drywall is usually sufficient for this purpose.
Another option is installing decorative ceiling tiles or planks. These can be glued directly to the popcorn ceiling or attached to furring strips. Wood planks, tin tiles, or foam tiles can completely transform the look while hiding the popcorn texture entirely.
Professional vs. DIY Considerations
Let's have a heart-to-heart about when to call in the pros. If your ceiling tests positive for asbestos, stop immediately and hire certified professionals. No ifs, ands, or buts about it! The health risks simply aren't worth the money saved.
For large areas (whole house projects), seriously consider hiring professionals. They have specialized equipment like dustless removal systems and can complete the job in a fraction of the time it would take you. The cost typically runs $1-3 per square foot for removal and basic finishing.
If you're dealing with high ceilings, complex room layouts, or painted popcorn that won't budge, professional help might save you time, frustration, and potentially money in the long run when you factor in tool rental, materials, and your valuable time.
Finishing Touches
Priming and Painting
You're in the home stretch now! After all that work, don't cheap out on primer and paint. Use a high-quality primer specifically designed for ceilings; it'll seal any remaining residue and provide a uniform base for paint.
Apply primer with a roller, using a brush to cut in around the edges. Work in sections, maintaining a wet edge to avoid lap marks. One coat of primer is usually sufficient, but if you see any stains bleeding through, spot-prime those areas with a stain-blocking primer.
For paint, choose a quality ceiling paint with a flat finish. Ceiling paints are formulated to minimize drips and provide better coverage on horizontal surfaces. Apply two thin coats rather than one thick one, allowing proper drying time between coats.
Adding Texture (If Desired)
Maybe you removed the popcorn but still want some texture for visual interest or to hide minor imperfections. There are several options that look way better than popcorn!
Knockdown texture is popular and relatively easy to apply with a hopper gun or texture roller. Orange peel texture provides subtle visual interest without being too dramatic. Skip trowel creates an almost stucco-like appearance that's very forgiving of imperfections.
Whatever texture you choose, practice on a piece of cardboard or spare drywall first. Texture application is part science, part art, and definitely benefits from some practice runs!
Conclusion
There you have it, folks! Learning how to remove popcorn ceiling safely and easily transforms your space from dated to dynamic. While it's definitely a messy, labor-intensive project, the results are absolutely worth the effort. Remember, safety comes first, especially when dealing with older homes. Take your time, protect yourself and your space properly, and don't hesitate to call professionals when needed. Your newly smooth ceilings will make your rooms feel larger, brighter, and decidedly more modern!
Read next: How to Cut Ceiling Tiles Easily and Safely
Frequently Asked Questions
Q1: How long does it take to remove popcorn ceiling from one room?
A: Typically 1-2 days for removal, plus 2-3 days for repairs and painting.
Q2: Can I paint over popcorn ceiling instead of removing it?
A: Yes, but it still looks dated and makes future removal much harder.
Q3: What's the average cost for professional popcorn ceiling removal?
A: Professional removal typically costs between $1 and $3 per square foot nationwide.
Q4: Is it safe to remove popcorn ceiling while living in the house?
A: Yes, if asbestos-free, but seal off work area completely from living spaces.
Q5: How can I tell if my popcorn ceiling has been painted?
A: Water will bead up instead of soaking in when sprayed on painted texture.
Stay up to date with our latest ideas!