How to Build Kitchen Cabinets: Step-by-Step DIY Guide
Learn how to build kitchen cabinets with our step-by-step DIY guide. Create custom cabinets and save big on your renovation!

Let's talk about the elephant in the room when it comes to kitchen renovations. Those gorgeous cabinets you've been eyeing? They probably cost more than your first car. Custom kitchen cabinets can easily run fifteen to thirty thousand dollars or more, and even stock options from big box stores add up faster than you'd expect. It's enough to make anyone's wallet cry!
But here's a little secret that cabinet makers don't necessarily want you to know. Building your own kitchen cabinets is absolutely doable for anyone with basic woodworking skills and a willingness to learn. We're not talking about slapping together some plywood boxes that'll fall apart in a year. We're talking about real, solid, professional-quality cabinets that'll last for decades and look like they cost a fortune.
Now, I won't sugarcoat it. This project requires time, patience, and a decent workshop setup. You're not going to knock this out in a weekend. But the satisfaction of cooking in a kitchen surrounded by cabinets you built with your own hands? That's priceless. Plus, the money you'll save could fund a pretty spectacular vacation, just saying.
This how to build kitchen cabinets: step-by-step DIY guide will take you from raw materials to installed, finished cabinets. Whether you're renovating your entire kitchen or just adding a few custom pieces, the fundamentals remain the same. So grab your tape measure and let's get building!
Why Building Your Own Cabinets Makes Sense
Before diving into the how, let's solidify the why. Understanding the benefits keeps you motivated through the challenging parts.
Serious Cost Savings
Materials for a complete set of kitchen cabinets typically run between one and three thousand dollars, depending on your wood choices. Compare that to ten times that amount for professional custom work, and suddenly this project looks very attractive.
Even factoring in tools you might need to purchase, you're still looking at massive savings. And those tools? They're yours forever, ready for future projects.
Complete Customization
When you build your own cabinets, every measurement is exactly what your kitchen needs. No awkward filler strips, no compromise dimensions, no settling for standard sizes that don't quite work.
Want extra-deep drawers for your pot collection? Done. Need a specific width to fit that awkward corner perfectly? No problem. Custom features that cabinet companies charge premium prices for become standard when you're the builder.
Quality Control
You choose every piece of wood, every hinge, every screw. No shortcuts, no cheap particle board hidden behind nice faces. When you build it yourself, you know exactly what's inside those boxes.
Many DIY builders actually construct cabinets stronger and more durable than mass-produced options because they're not trying to maximize profit margins.
Planning Your Cabinet Project
Rushing into cutting wood without proper planning is a recipe for expensive mistakes. Take your time with this phase.
Measuring Your Space
Measure your kitchen at least three times. Measure wall lengths, ceiling height, window positions, doorways, and any obstacles like pipes or electrical panels. Note where outlets are located and where plumbing connects.
Create a detailed sketch showing all measurements. Graph paper helps maintain scale, or use free kitchen design software for digital planning.
Don't forget to account for appliance dimensions. Your refrigerator, stove, and dishwasher all need specific clearances and cabinet configurations around them.
Deciding on Cabinet Types
Base cabinets sit on the floor and support countertops. Standard depth is 24 inches, with heights around 34.5 inches before countertops. These are your workhorses, holding heavy items and providing main storage.
Wall cabinets mount above counters and appliances. Typical depth is 12 inches, with varying heights depending on ceiling clearance and personal preference. They're lighter duty but add tremendous storage.
Tall cabinets, like pantries or oven surrounds, span from floor to near ceiling. These require more material but maximize vertical storage space.
Choosing Your Materials
Plywood forms the backbone of quality cabinets. Three-quarter inch plywood works for cabinet boxes, while half-inch handles backs adequately. Choose cabinet-grade plywood with smooth faces for visible surfaces.
For face frames and doors, solid hardwood provides beauty and durability. Popular choices include oak, maple, cherry, and hickory. Each has distinct grain patterns and finishing characteristics.
MDF, or medium-density fiberboard, works well for painted cabinet doors. It machines smoothly and takes paint beautifully, though it's heavier than wood and can't handle moisture.
Essential Tools You'll Need
Having the right tools makes this project infinitely more manageable. Here's what to gather before starting.
Power Tools
A table saw is practically essential for ripping plywood sheets to exact widths. A quality fence ensures consistent, accurate cuts throughout the project.
A miter saw handles crosscuts and angled cuts for face frames. Compound capability isn't necessary but adds versatility.
A router with various bits creates edge profiles, dados, and rabbets that give cabinets professional finishing touches.
A drill and impact driver handle assembly and hardware installation. Having both means never switching bits mid-task.
A random orbital sander prepares surfaces for finishing. This step takes time but determines how good your final product looks.
Hand Tools and Accessories
Clamps in various sizes hold pieces during assembly. You honestly can't have too many clamps. Buy more than you think you need.
A pocket hole jig creates strong, hidden joints perfect for face frame construction. This tool revolutionized DIY cabinet building.
Squares, levels, and measuring tools ensure accuracy. A combination square and speed square handle most layout needs.
How to Build Kitchen Cabinets: Step-by-Step DIY Guide for Base Cabinets
Now we're getting to the good stuff. Let's build a basic base cabinet that you can replicate for your entire kitchen.
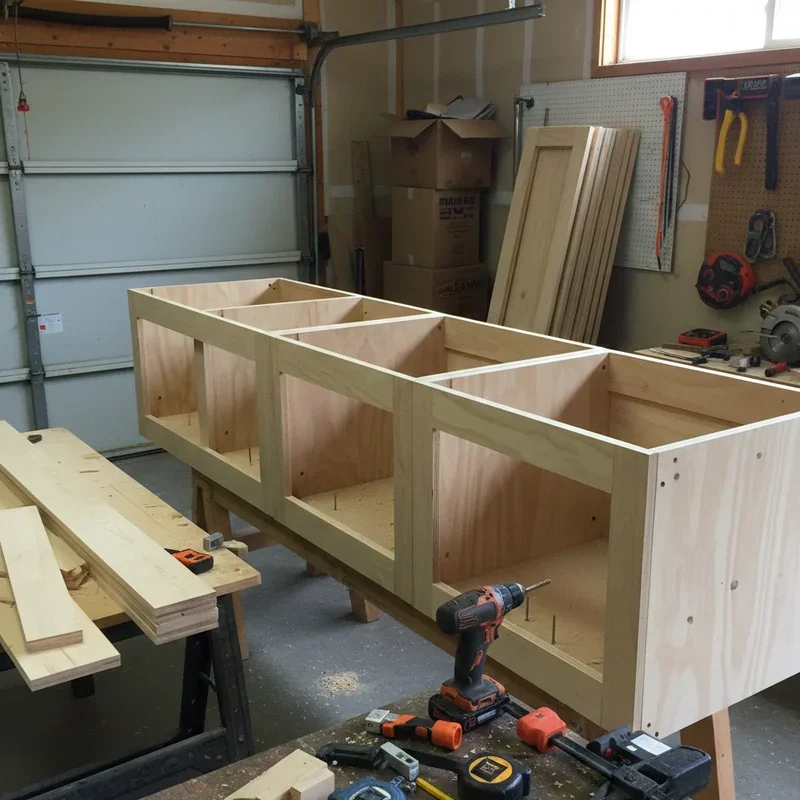
Step 1: Cut the Cabinet Box Parts
From three-quarter inch plywood, cut two side panels at 23.25 inches deep by 31 inches tall. These dimensions work for standard base cabinet proportions.
Cut a bottom panel to match your desired cabinet width minus 1.5 inches (accounting for the side panel thickness) by 23.25 inches deep.
Cut a back panel from half-inch plywood to match the overall box dimensions. The back adds crucial rigidity to the structure.
Cut two stretcher rails, about 4 inches wide, from three-quarter inch plywood. These span the top of the cabinet front and back, supporting the countertop.
Step 2: Cut the Joinery
Using your router or table saw, cut a three-quarter inch dado, half an inch deep, across each side panel where the bottom will sit. Position this about 4 inches up from the bottom edge, creating a toe kick space.
Cut a quarter-inch rabbet along the back edge of each side panel to receive the back panel. This creates a clean, flush back surface.
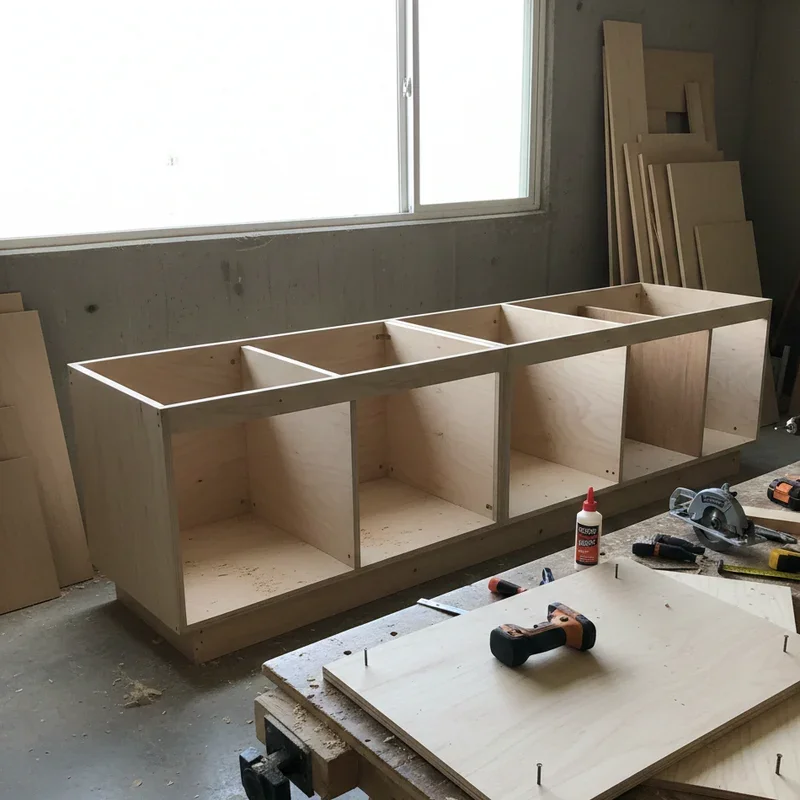
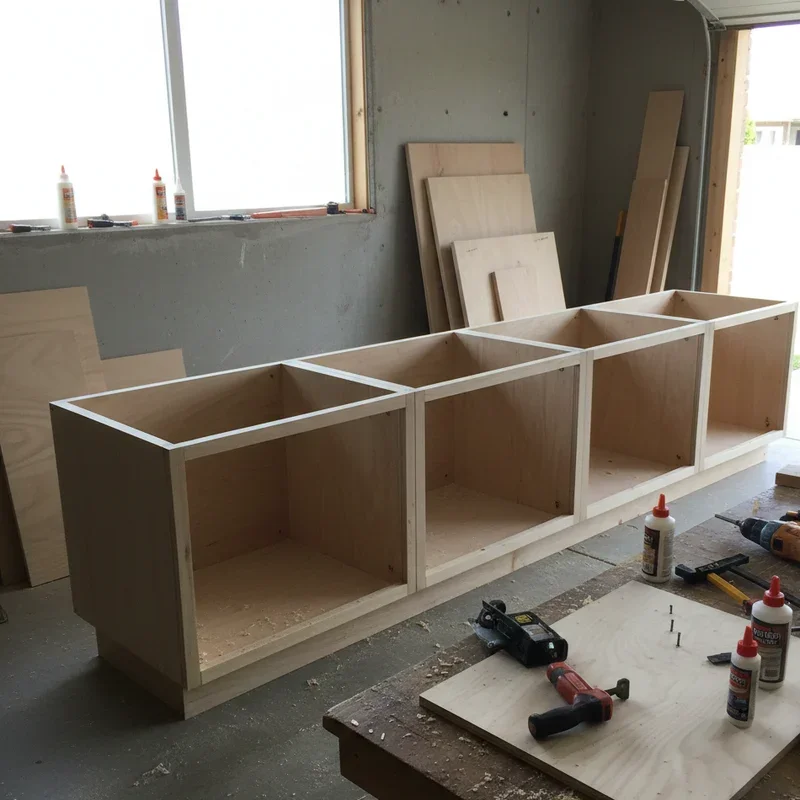
Step 3: Assemble the Box
Dry fit all pieces first to ensure everything aligns properly. Making adjustments now is much easier than after glue is applied.
Apply wood glue to the dados and slide the bottom panel into position. Secure with screws or brad nails from the outside of the side panels.
Attach the stretcher rails at the top front and back, connecting the two side panels. These must be level and square.
Slide the back panel into its rabbets and secure with brad nails along all edges. The back squares up the entire cabinet, so check for square before nailing completely.
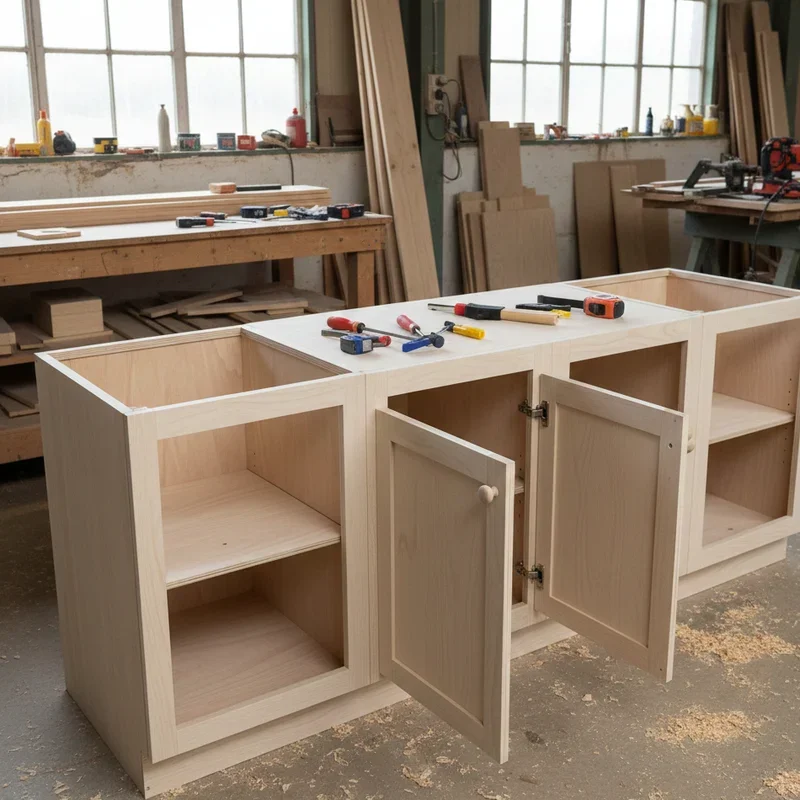
Step 4: Build the Face Frame
Face frames give cabinets their finished front appearance and provide mounting surfaces for doors and hinges.
Cut stiles (vertical pieces) from solid hardwood at 1.5 inches wide by 31 inches tall. You'll need two per cabinet.
Cut rails (horizontal pieces) at 1.5 inches wide by your cabinet width minus 3 inches. You'll need a top and bottom rail.
Using pocket hole joinery, assemble the face frame. Rails connect between stiles, creating a rectangle that exactly matches your cabinet box front.
Step 5: Attach the Face Frame
Apply wood glue to the front edges of your cabinet box. Position the face frame flush with the outside edges of the cabinet.
Use clamps to hold everything in place while you drive brad nails or pocket screws from inside the cabinet. Check alignment frequently as you work around the frame.
Fill any nail holes with wood putty and sand smooth once dry.
How to Build Kitchen Cabinets: Step-by-Step DIY Guide for Doors and Drawers
Cabinets aren't complete without functional doors and drawers. These components showcase your craftsmanship most visibly.
Building Cabinet Doors
The simplest approach uses flat panel construction. Cut your door panels from three-quarter inch plywood or MDF, oversizing by 1 inch in each direction to create overlay coverage.
For more traditional appearance, build frame-and-panel doors. This involves cutting stiles and rails with cope-and-stick router bits, then inserting a raised or flat center panel.
Shaker-style doors offer a middle ground. A simple frame surrounds a flat center panel, creating clean lines that suit many kitchen styles.
Constructing Drawer Boxes
Drawer boxes use half-inch plywood or solid wood for sides, front, and back. The bottom can be quarter-inch plywood captured in grooves.
Cut sides at your desired drawer depth minus 1 inch for clearance. Front and back pieces span between the sides.
Cut grooves near the bottom edge of all four pieces to capture the bottom panel. Assemble with glue and brad nails, ensuring perfect squareness.
A separate decorative drawer front attaches to the basic box, matching your door style for cohesive appearance.
Installing Drawer Slides
Soft-close ball bearing slides transform drawer function. Mount cabinet-side pieces first, ensuring perfect level and alignment.
Attach drawer-side pieces to your drawer boxes following manufacturer spacing specifications. Most slides require specific distances from the drawer edges.
Test operation before final installation. Properly installed slides should open and close smoothly without binding or wobbling.
Wall Cabinet Construction
Wall cabinets follow similar principles but with some key differences.
Adjusted Dimensions
Standard wall cabinet depth is 12 inches, making boxes lighter and easier to handle. Heights typically range from 30 to 42 inches depending on ceiling height and preference.
Wall cabinets often have no toe kick since they're mounted high. The bottom of the box can be flush with the sides.
Hanging Rails
Include a sturdy hanging rail along the back top edge of each wall cabinet. This rail, typically made from three-quarter inch hardwood, provides secure mounting points for screws into wall studs.
A similar rail at the bottom helps level cabinets during installation and adds structure.
Installation Considerations
Wall cabinets must attach to wall studs, not just drywall. Locate studs during planning and ensure your cabinet layout aligns with available mounting points.
Installing wall cabinets requires helpers or specialized supports. Don't attempt to hold heavy cabinets while also driving screws.
Finishing Your Cabinets
All your hard work deserves a beautiful finish that protects and enhances the wood.
Sanding Sequence
Start with 120-grit sandpaper to remove tool marks and rough spots. Progress through 150-grit, then 180-grit, and finally 220-grit for glass-smooth surfaces.
Sand with the grain direction always. Cross-grain scratches show horribly under finish.
Finishing Options
For natural wood appearance, apply penetrating oil finishes or wiping varnish. Multiple thin coats build protection while showcasing grain beauty.
Paint requires primer first, then multiple topcoats. Sand lightly between coats for professional smoothness.
Conversion varnish or catalyzed lacquer provides the most durable factory-like finish but requires spray equipment and proper ventilation.
Installation Day
With all components built and finished, installation brings everything together.
Start with upper cabinets so you're not reaching over base cabinets during installation. Use a ledger board temporarily screwed to the wall to support cabinets while mounting.
Install base cabinets next, shimming as needed to level across uneven floors. Connect adjacent cabinets to each other through face frames.
Hang doors and install drawer boxes last. Adjust hinges until doors align perfectly and operate smoothly.
Conclusion
Building your own kitchen cabinets is absolutely achievable with this how to build kitchen cabinets: step-by-step DIY guide and dedication to learning the craft. While the project demands significant time and careful attention to detail, the rewards include massive cost savings, complete customization, and the profound satisfaction of creating something beautiful and functional with your own hands. Start with a single cabinet to develop your skills before tackling the entire kitchen. Take your time, measure twice, and soon you'll be admiring professional-quality cabinets that you built yourself!
Read next: How to Make DIY Shaker Cabinet Doors at Home
Frequently Asked Questions
1. How long does it take to build a complete set of kitchen cabinets?
Expect four to eight weeks working evenings and weekends for an average-sized kitchen project.
2. What type of plywood is best for building kitchen cabinets?
Cabinet-grade birch or maple plywood with smooth faces provides excellent durability and finishing results.
3. Can beginners successfully build their own kitchen cabinets?
Yes, beginners with patience can succeed by starting simple and building skills progressively throughout the project.
4. How much money can I save by building cabinets myself?
Most DIY builders save between 60 and 80 percent compared to custom cabinet shop prices.
5. Do I need expensive tools to build quality kitchen cabinets?
Basic table saw, router, and drill handle most tasks, though quality tools improve accuracy and efficiency.
Stay up to date with our latest ideas!