How to Build a Barn Door: DIY Tips for Beginners
Discover how to build a barn door with these DIY tips for beginners. Transform any room with rustic charm using our easy guide!
There's something undeniably charming about a sliding barn door, isn't there? Maybe you've spotted them on home renovation shows or scrolled past gorgeous examples on social media. These beauties have become the darling of interior design, and honestly, it's easy to see why. They save space, add character, and make a statement that traditional swinging doors simply can't match.
Now, here's what might surprise you. Building one yourself is completely doable, even if you've never tackled a woodworking project before. I know, I know. Looking at those picture-perfect barn doors might have you thinking you'd need years of carpentry experience. But the truth is, with the right guidance and a weekend to spare, you can create something that'll have your neighbors asking where you bought it.
This how to build a barn door: DIY tips for beginners guide will take you through every step of the process. We'll cover everything from selecting your lumber to that satisfying moment when you slide your finished door across the track for the first time. Whether you're replacing a closet door, creating a pantry entrance, or adding privacy to a home office, you're in the right place. Let's get your hands dirty and build something beautiful.
Why Barn Doors Have Captured Everyone's Hearts
Before we jump into construction, let's talk about what makes these doors so special. Understanding the appeal helps you make design choices that'll work perfectly for your space.
Barn doors originated in, well, barns. Their sliding mechanism allowed farmers to open and close large openings without needing clearance for a swinging door. Fast forward to today, and that same practical benefit translates brilliantly to modern homes where square footage comes at a premium.
Think about your bathroom door for a second. A traditional door needs several feet of clearance to swing open, eating up valuable floor space. A barn door? It slides right along the wall, freeing up room for furniture, storage, or just easier movement through tight areas.
Beyond the practical stuff, these doors bring warmth and texture that newer construction often lacks. They introduce natural wood tones, interesting hardware, and a focal point that draws the eye. In open-concept living spaces that can feel a bit stark, a barn door adds the visual interest that pulls everything together.
Gathering Your Materials and Tools
Alright, let's get down to brass tacks. You can't build anything without the right supplies, and shopping smart now saves headaches later.
Wood Selection for Your Door
The wood you choose sets the tone for your entire project. Here are your main options to consider.
Pine boards remain the most popular choice for DIYers, and there's good reason for that. Pine is lightweight, affordable, and takes stain like a dream. You'll find it at every lumber yard and home improvement store, usually in standard dimensions that make planning easy.
Cedar offers natural resistance to warping and moisture, making it ideal for bathroom applications. It's pricier than pine but worth the investment if your door will face humid conditions regularly.
Reclaimed wood brings authentic character that new lumber simply cannot replicate. Old fence boards, pallet wood, or salvaged barn siding give your door instant history and unique imperfections that tell a story.
Plywood works wonderfully when you want a smooth, modern look. A single sheet cut to size and framed with trim creates a clean aesthetic that suits contemporary homes beautifully.
Hardware You'll Need
The track system is arguably more important than the door itself. Skimping here leads to doors that stick, jump off the track, or eventually crash down. Trust me, you don't want that drama.
Purchase a complete barn door hardware kit that includes the track rail, rollers, spacers, door stops, and floor guide. These kits come sized for different door weights and widths, so know your dimensions before buying. A door that weighs 100 pounds needs heavier-duty hardware than a lightweight hollow-core conversion.
You'll also need wood screws in various lengths, wood glue for extra joint strength, sandpaper ranging from 80 to 220 grit, and your choice of finish whether that's stain, paint, or clear sealer.
Tools for the Job
Rounding up your tools before starting keeps the project flowing smoothly. There's nothing worse than stopping mid-build for a hardware store run.
A circular saw handles the main cutting work, though a miter saw makes crosscuts cleaner if you have access to one. Your drill does double duty creating pilot holes and driving screws. Clamps hold pieces together while glue dries and are absolutely essential for solo builders.
Measuring tools include your tape measure, carpenter's square, and a long straightedge for marking cut lines. A level ensures your track hangs perfectly horizontal because a crooked track means a door that rolls on its own.
Don't forget safety equipment. Glasses protect your eyes from sawdust and flying debris. Ear protection matters when you're running power tools for extended periods.
How to Build a Barn Door: DIY Tips for Beginners Starting with Design
Every successful project starts with a solid plan. Rushing into cuts without thinking through design leads to frustration and wasted materials.
Measuring Your Opening
Grab your tape measure and let's figure out exactly what size door you need. Measure the width of your doorway at the top, middle, and bottom. Walls aren't always perfectly straight, so use the widest measurement and add at least 2 inches on each side for overlap.
Height matters too. Measure from floor to the top of the door frame, then add enough to account for your hardware. Most track systems require 6 to 8 inches of clearance above the opening, so ensure you have enough wall space.
Consider what's on the wall where the door will slide when open. Light switches, outlets, and vents might need relocation if they fall in the door's path. Better to discover this now than after you've hung the track.
Choosing Your Door Style
Barn doors come in countless variations, and picking the right style for your home makes all the difference.
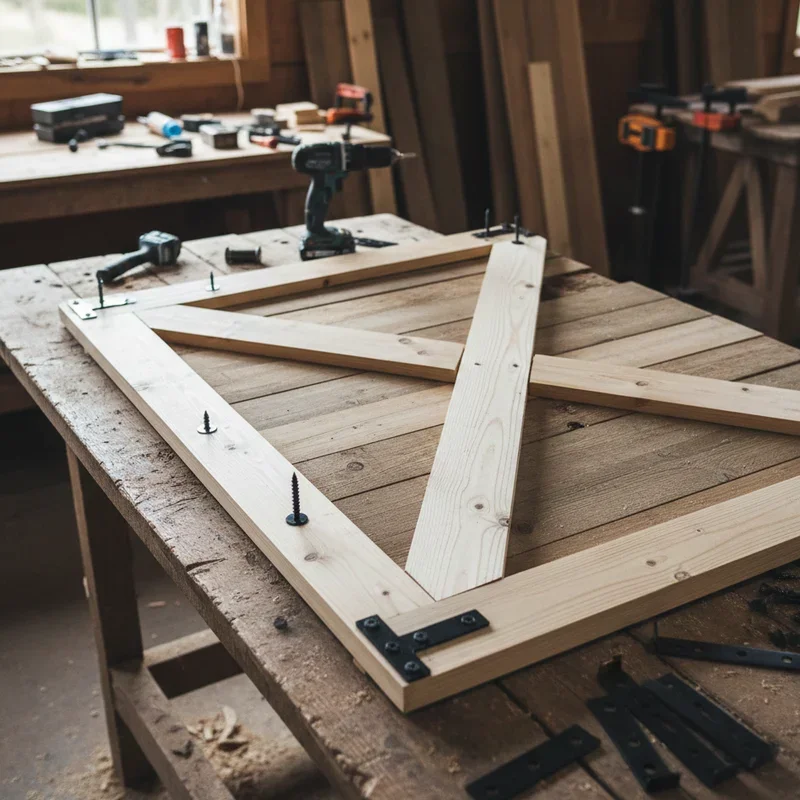
The classic Z-brace design features horizontal boards connected by a diagonal brace forming a Z shape. It's traditional, sturdy, and relatively simple to construct. Most people picture this style when they think "barn door."
X-brace doors add visual interest with crossed diagonal pieces. They feel slightly more decorative while maintaining that rustic farmhouse appeal.
Horizontal plank designs use boards running side to side rather than vertically. This contemporary take works beautifully in modern spaces and actually makes rooms feel wider.
Panel doors incorporate raised or flat panels framed by stiles and rails. They look more like traditional interior doors but slide on barn door hardware for a refined yet functional result.
Building the Door Frame and Panels
Now we're cooking with gas. It's time to start actually building this thing.
Cutting Your Boards
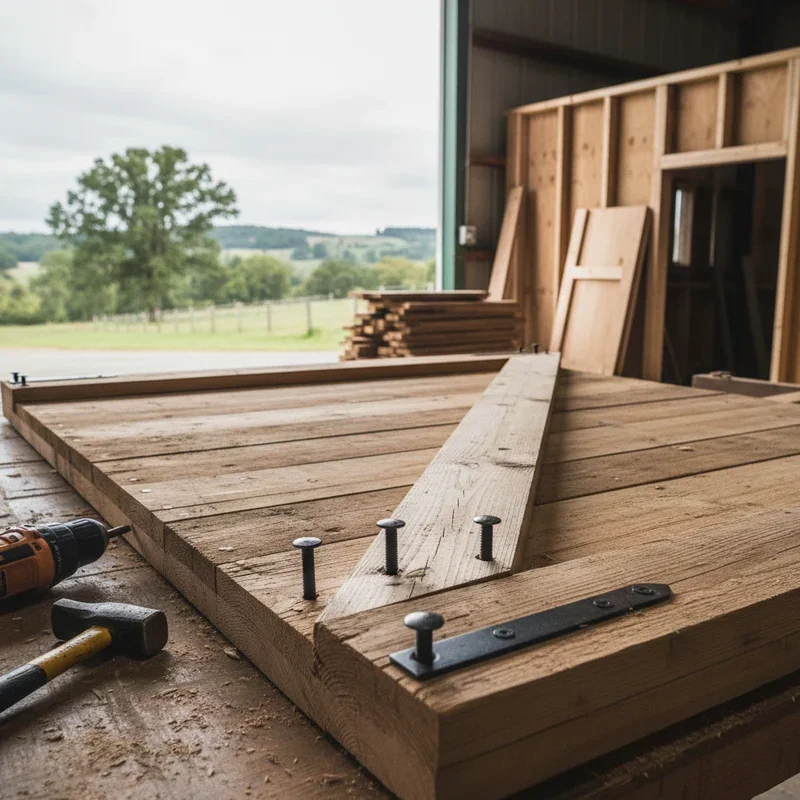
Lay out your lumber and create a cut list based on your measurements. For a basic Z-brace door that's 36 inches wide and 84 inches tall, you'll need vertical boards cut to 84 inches, horizontal braces at 36 inches, and diagonal braces measured and cut to fit.
Mark all your cuts clearly with a pencil and double-check measurements before sawing. Once you've cut wood too short, there's no going back. Take your time here because accuracy at this stage determines how square and professional your finished door looks.
Sand each piece after cutting, especially the cut ends where the saw leaves rough fibers. Start with coarser sandpaper to remove saw marks, then progress to finer grits for smoothness. Wiping boards with a tack cloth removes dust before assembly.
Assembling the Face
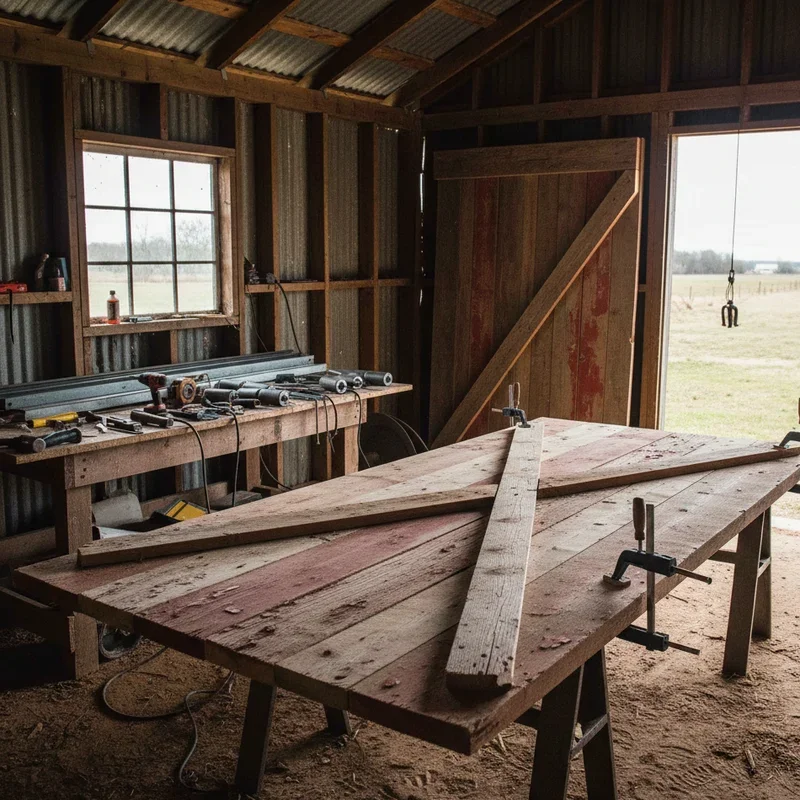
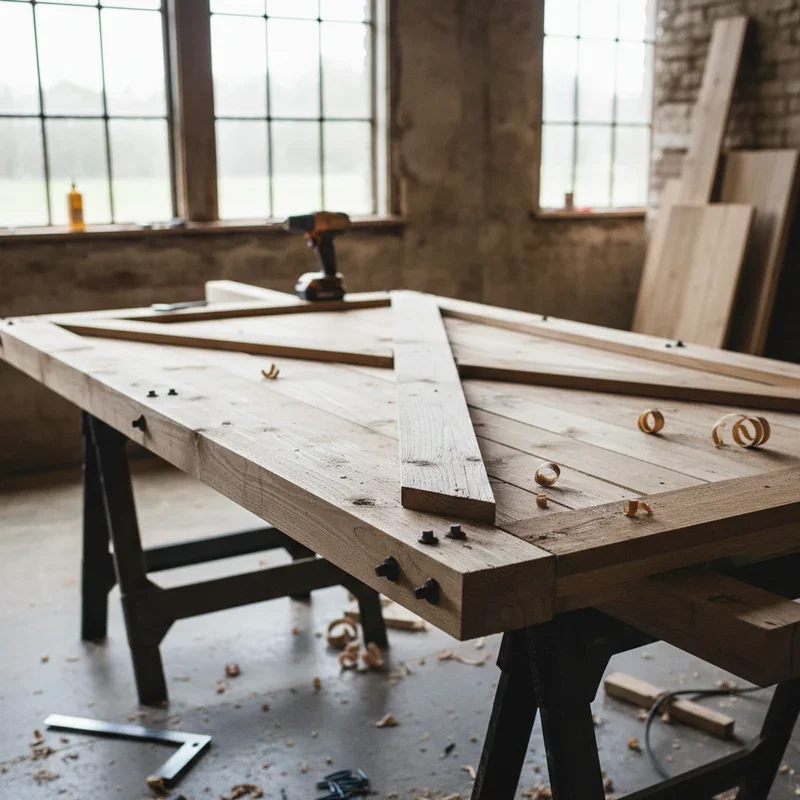
Clear a flat workspace large enough to lay out your door. A garage floor, driveway, or large workbench all work perfectly. The key is having a level surface where pieces won't shift during assembly.
Arrange your vertical boards side by side, alternating the direction of any wood grain cupping to keep the door flat. Butt them tightly together or leave small gaps between boards for a more rustic appearance.
Once you're happy with the arrangement, lay your horizontal braces across the back. Position one near the top, one near the bottom, and one in the middle for doors over 6 feet tall. Pre-drill holes to prevent splitting, then drive screws through the braces into each vertical board.
For the Z-brace, measure and cut your diagonal piece to span from the bottom of the upper horizontal to the top of the lower horizontal. This brace should point downward toward the hinge side, which prevents the door from sagging over time.
Apply wood glue before screwing the diagonal in place. The combination of glue and mechanical fasteners creates joints that'll stay tight for decades.
Finishing Your Door to Perfection
With construction complete, finishing transforms raw wood into a gorgeous focal point. Don't rush this phase because the finish is what everyone sees.
Preparing the Surface
Go over the entire door with fine sandpaper, paying extra attention to any rough spots, pencil marks, or glue squeeze-out. Sanding between construction and finishing ensures your stain or paint adheres properly and looks smooth.
Fill any gaps, knot holes, or screw indentations with wood filler. Match the filler to your final color when staining, or use standard filler when painting. Once dry, sand the filled areas flush with the surrounding wood.
Wipe the entire door with a damp cloth to raise the wood grain, let it dry, then do a final light sanding. This extra step prevents grain from raising after you've applied finish, which would leave you with a rough surface.
Staining for Rustic Warmth
Staining brings out wood's natural beauty while adding color and depth. Apply stain with a brush or rag, working in the direction of the grain. Let it penetrate for a few minutes, then wipe away excess with clean cloths.
Building color gradually through multiple thin coats gives you more control than trying to achieve your target shade in one heavy application. Each additional coat deepens the tone, so stop when you've reached the look you want.
Popular stain colors for barn doors include weathered gray for a modern farmhouse feel, dark walnut for rich traditional warmth, and natural tones that let the wood speak for itself.
Painting for a Clean Aesthetic
Paint works wonderfully when you want your door to match existing trim or make a bold color statement. Start with a quality primer, especially on knotty pine where sap can bleed through paint over time.
Apply paint in thin, even coats with a brush for texture or a roller for smoothness. Two or three coats typically provide full coverage and durability. Let each coat dry completely before applying the next.
White and black remain the most popular painted barn door colors, but don't let that limit you. Navy blue, forest green, or even a sunny yellow can make your door a stunning conversation piece.
Sealing for Longevity
Whatever finish you've chosen, a clear topcoat protects your work from daily wear, moisture, and dirt. Polyurethane offers excellent durability for high-traffic areas. Satin or matte sheens look most natural on rustic projects, while semi-gloss works nicely on painted doors.
Apply thin coats with a quality brush, sanding lightly between layers. Three coats provide solid protection without building up an overly thick, plasticky appearance.
Installing the Track System
Your door is built and beautiful. Now let's hang this thing properly so it operates smoothly for years to come.
Finding Your Mounting Points
The track needs to attach to something solid, and drywall alone won't cut it. You have two options here depending on your wall situation.
Mounting directly into wall studs provides the strongest connection. Use a stud finder to locate studs, mark their centers, and plan your track position so mounting holes align with solid wood behind the drywall.
When studs don't line up where you need them, a header board bridges multiple studs and gives you continuous solid backing for the track. Cut a board to span at least two studs beyond each end of your track, mount it securely into the studs, then attach your track to this board.
Leveling and Securing the Track
Hold the track in position and mark your mounting holes. Use a level constantly during this process because even a slight slope sends your door rolling on its own.
Pre-drill pilot holes, then drive lag bolts through the track brackets into studs or your header board. Tighten evenly across all mounting points, checking level as you go. A track that warps during installation causes rollers to bind.
Install door stops at each end of the track to prevent the door from sliding off. Mount the floor guide at the bottom to keep the door from swinging, positioning it so the door sits centered in the opening.
Hanging Your Finished Door
We're in the home stretch now. This how to build a barn door: DIY tips for beginners journey is almost complete.
Attach the roller hardware to the top of your door according to your kit's instructions. Most systems use bolts that pass through the door thickness, so you'll need someone to help hold things in place while you tighten from the other side.
Lift the door and hook the rollers onto the track. Having a helper makes this infinitely easier, especially with heavier doors. Once hanging, slide it back and forth to check operation. Adjust the rollers if the door doesn't hang perfectly level or if it rubs anywhere.
Make final adjustments to door stops so the door centers over the opening when closed and clears the frame completely when open.
Troubleshooting Common Issues
Even carefully built doors sometimes need tweaking. Here's how to solve the problems you're most likely to encounter.
If your door sticks or binds, check that the track is perfectly level and that nothing obstructs the roller path. Sometimes a tiny paint drip or rough spot causes friction.
A door that swings at the bottom needs floor guide adjustment. The guide channel should hold the door snugly without excessive force.
Sagging usually indicates inadequate support. Adding bracing to the door back or upgrading to heavier-duty hardware typically solves this issue.
Gaps between the door and wall happen when spacers aren't correct. Most hardware kits include different spacer sizes to accommodate varying wall conditions.
Conclusion
Building a barn door transforms both your space and your confidence as a DIYer. What starts as lumber and hardware becomes a functional piece of art that you created with your own hands. The skills you've learned here transfer to countless future projects, each one building on what you've mastered today. Take your time, enjoy the process, and don't stress about perfection. Those small imperfections often add character that makes handmade pieces special. Your new barn door is waiting to slide into place and change the whole feel of your room.
Read next: 15 Home Addition Ideas to Upgrade Your Living Area in Style
Frequently Asked Questions
1. What's the ideal thickness for a DIY barn door to prevent warping?
One and a half inches thick provides excellent stability while keeping weight manageable for standard hardware.
2. Can I convert an existing interior door into a sliding barn door?
Yes, add surface-mounted trim and attach roller hardware, though hollow doors may need reinforcement first.
3. How much wall space do I need beside the door opening?
Plan for wall space at least equal to your door width so it can slide completely open.
4. What weight can standard barn door hardware typically support safely?
Most residential hardware kits support doors weighing between 150 and 200 pounds comfortably.
5. Do barn doors provide enough privacy for bathrooms and bedrooms?
They offer visual privacy but less sound isolation than traditional doors with weatherstripping installed.
Stay up to date with our latest ideas!