How to Build a Desk: Tools, Steps, and Smart Tips
Learn how to build a desk with our complete guide covering essential tools, easy steps, and smart tips for crafting your dream workspace.
There's something genuinely satisfying about sitting down at a desk you've built with your own two hands. Maybe it's the pride that comes from creating something functional and beautiful, or perhaps it's knowing that every measurement, every cut, and every screw was placed exactly where you wanted it. Whatever the reason, building your own desk has become increasingly popular among DIY enthusiasts and first-time woodworkers alike.
Let's face it, store-bought desks can be ridiculously expensive, and honestly, the quality doesn't always match the price tag. You've probably walked through furniture stores, seen those hefty price stickers, and thought to yourself, "I could build something better for half that cost." Well, you're absolutely right, and this guide on how to build a desk: tools, steps, and smart tips will show you exactly how to make that happen.
Whether you're working from home and need a dedicated workspace, setting up a gaming station, or simply want a craft table for your hobbies, building your own desk opens up a world of possibilities. You get to choose the size, the style, the wood type, and every little detail that makes it uniquely yours. Plus, there's no denying the conversation starter you'll have when someone asks where you got that gorgeous desk.
Throughout this comprehensive guide, we'll walk through everything you need to know about how to build a desk: tools, steps, and smart tips that'll transform raw lumber into a functional piece of furniture you'll be proud to use every day. So roll up your sleeves, grab a cup of coffee, and let's dive into this rewarding project together.
Planning Your Desk Build: The Foundation of Success
Before you pick up a single tool or buy any materials, you've got to spend some quality time planning. Trust me, skipping this step is where most DIY projects go sideways. A well-thought-out plan saves you time, money, and a whole lot of frustration down the road.
Determining Your Desk Dimensions
First things first, where's this desk going to live? Measure your space carefully, and don't forget to account for your chair, any drawers that might need to open, and enough room to actually move around comfortably. Standard desk height typically falls between 28 and 30 inches, but if you're particularly tall or short, feel free to adjust accordingly.
Think about what you'll actually be doing at this desk. A simple writing desk doesn't need to be massive, but if you're running multiple monitors for work or gaming, you'll want something with more real estate. Consider these common dimensions as starting points:
Small writing desk: 40 inches wide by 20 inches deep
Standard home office desk: 60 inches wide by 30 inches deep
Large workstation: 72 inches wide by 36 inches deep
Choosing Your Desk Style
The style of desk you build should complement your space and meet your functional needs. Here are some popular options to consider:
Simple Farmhouse Desk: Clean lines, sturdy construction, and that rustic charm that never goes out of style. Perfect for beginners because the joinery is straightforward.
Modern Minimalist Desk: Sleek and streamlined with hidden cable management and minimal visual bulk. These often feature metal legs paired with a wooden top.
Executive Style Desk: Larger, more substantial, often with built-in drawers and storage. A bigger project, but incredibly rewarding when completed.
Standing Desk Frame: If you're health-conscious about sitting all day, building a standing desk or one with adjustable height options might be right up your alley.
Essential Tools for Building Your Desk
Now we're getting to the good stuff. Having the right tools makes all the difference between a frustrating experience and an enjoyable afternoon of woodworking. You don't need to break the bank buying professional-grade equipment, but investing in quality basics will serve you well for years to come.
Power Tools You'll Need
Circular Saw or Table Saw: For making straight cuts in your lumber. A circular saw with a guide rail works beautifully for most desk projects and costs considerably less than a table saw.
Drill/Driver: Absolutely essential for drilling pilot holes and driving screws. A cordless model gives you freedom of movement without tripping over cords.
Orbital Sander: You could sand by hand, but why would you? An orbital sander speeds up the process dramatically and gives you a smoother finish with less effort.
Pocket Hole Jig: This little tool is a game-changer for furniture building. It creates strong, hidden joints that look professional without requiring advanced joinery skills.
Hand Tools to Keep Close By
Even in this age of power tools, you'll still need some trusty hand tools:
Tape measure (get a good one that won't let you down)
Combination square for marking and checking angles
Carpenter's pencil for marking cut lines
Clamps, clamps, and more clamps (you can never have too many)
Level for ensuring your desktop is perfectly flat
Chisel set for cleaning up joints
Rubber mallet for gentle persuasion when pieces need encouragement
Safety Equipment
Here's something that shouldn't be optional but often gets overlooked. Protect yourself with proper safety gear:
Safety glasses or goggles
Hearing protection when using loud power tools
Dust mask or respirator
Work gloves for handling rough lumber
Selecting Your Materials
The materials you choose will dramatically affect both the appearance and durability of your finished desk. Let's break down your options so you can make an informed decision.
Wood Options for Your Desktop
Solid Hardwood: Oak, maple, walnut, and cherry are popular choices. They're beautiful, durable, and will last for generations. However, they come with a higher price tag and can be challenging to work with if you're just starting out.
Pine: Much more affordable and forgiving to work with. Pine takes stain beautifully and can look surprisingly elegant when finished properly. It's softer than hardwood, so it may dent more easily over time.
Plywood: Don't turn your nose up at plywood. High-quality birch plywood with edge banding can create a stunning, stable desktop at a fraction of hardwood prices. It's less prone to warping than solid wood, which is a genuine advantage.
Butcher Block: Pre-made butcher block countertops make excellent desktop surfaces. They're already glued up, sanded smooth, and ready for finishing. This option saves considerable time while still giving you that solid wood look.
Hardware and Fasteners
Stock up on these items before you begin:
Wood screws in various lengths (typically 1.25 inch and 2.5 inch)
Pocket hole screws if using a pocket hole jig
Wood glue (Titebond II or III works great)
Desk grommets for cable management
Furniture levelers or felt pads for the feet
Drawer slides if you're including storage
Step-by-Step Building Process
Alright, this is where the rubber meets the road. Following these steps will guide you through creating a beautiful, functional desk from scratch.
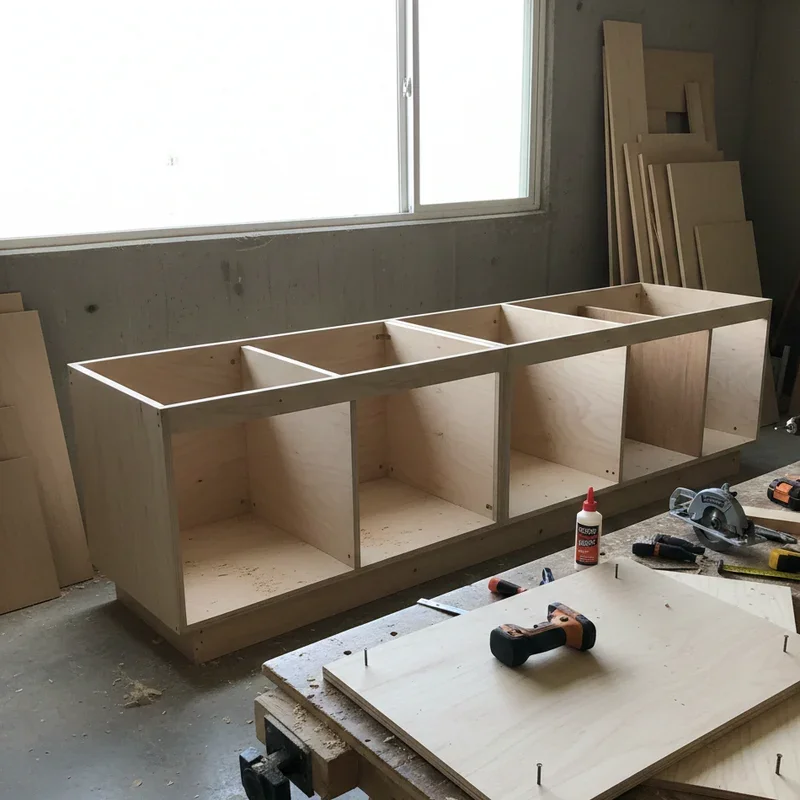
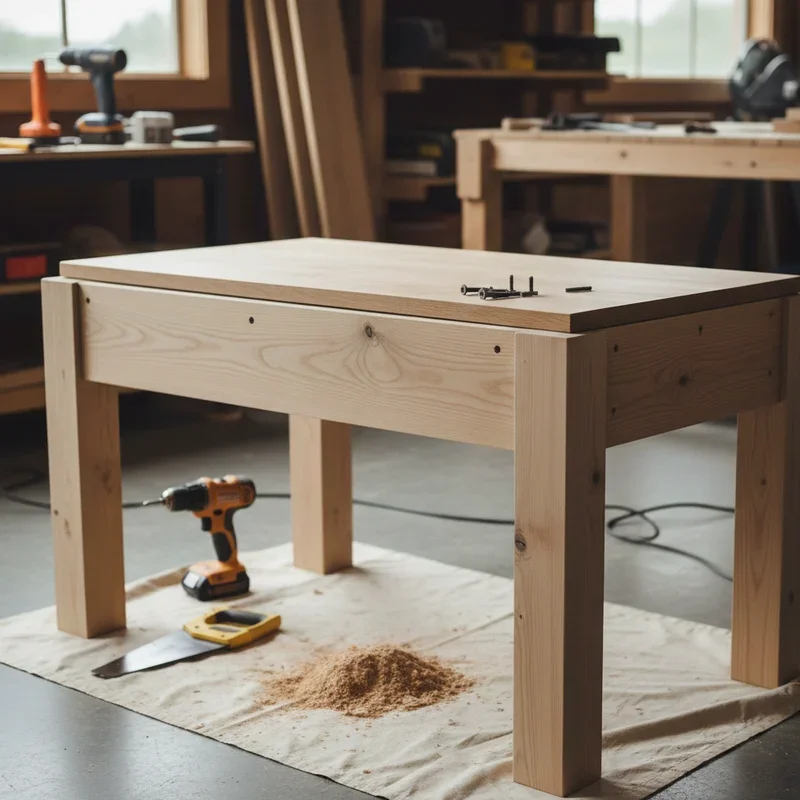
Step 1: Prepare Your Lumber
Start by inspecting all your wood for defects, warping, or damage. Let newly purchased lumber acclimate to your workspace for at least a few days before cutting. This helps prevent warping after assembly.
Once your wood has acclimated, sand all surfaces with 80-grit sandpaper to remove any mill marks or rough spots. Progress through 120-grit and finish with 150 or 180-grit for a smooth surface that's ready for finishing.
Step 2: Cut Your Pieces to Size
Measure twice, cut once. You've heard it a million times because it's absolutely true. Mark your cut lines clearly with a carpenter's pencil and use a square to ensure straight lines.
For a basic desk, you'll typically need to cut:
One desktop piece (or multiple boards to be joined)
Four legs (or two leg assemblies)
Front and back apron pieces
Side apron pieces
Any additional support stretchers
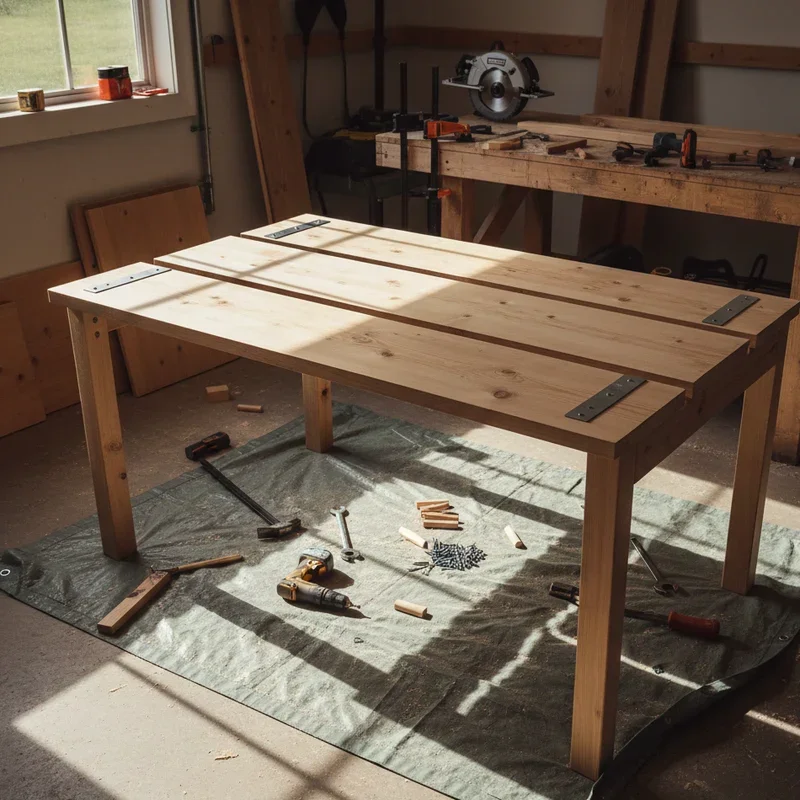
Step 3: Join Your Desktop Boards
If you're using multiple boards for your desktop, now's the time to glue them together. Apply wood glue to the edges, align the boards carefully, and clamp them tightly. Alternate your clamps above and below to prevent bowing. Let the glue cure for at least 24 hours before removing clamps.
After the glue has fully cured, use a hand plane or belt sander to level any minor height differences between boards. Then sand the entire surface smooth.
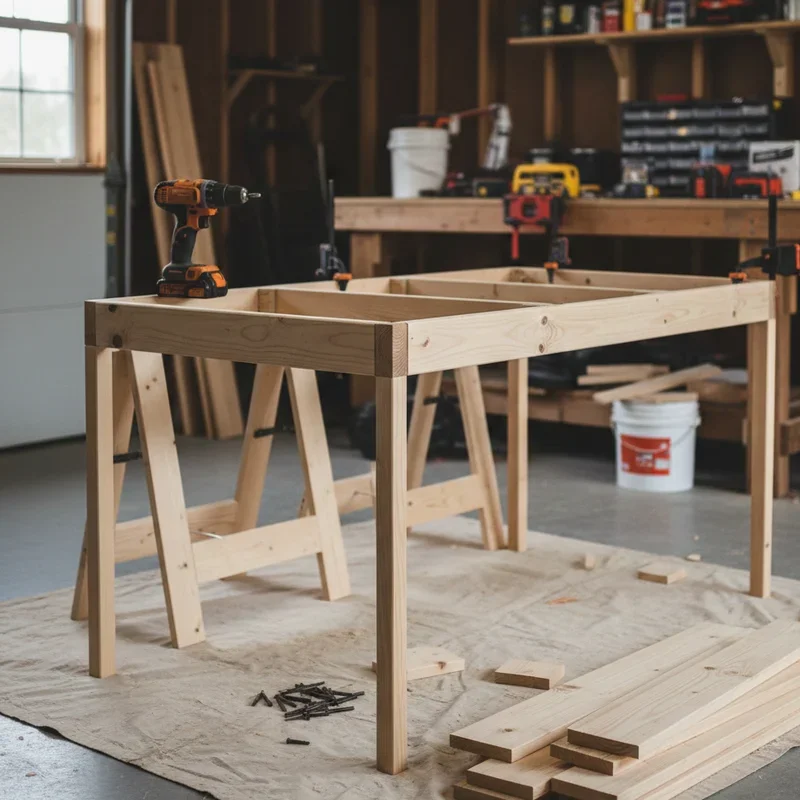
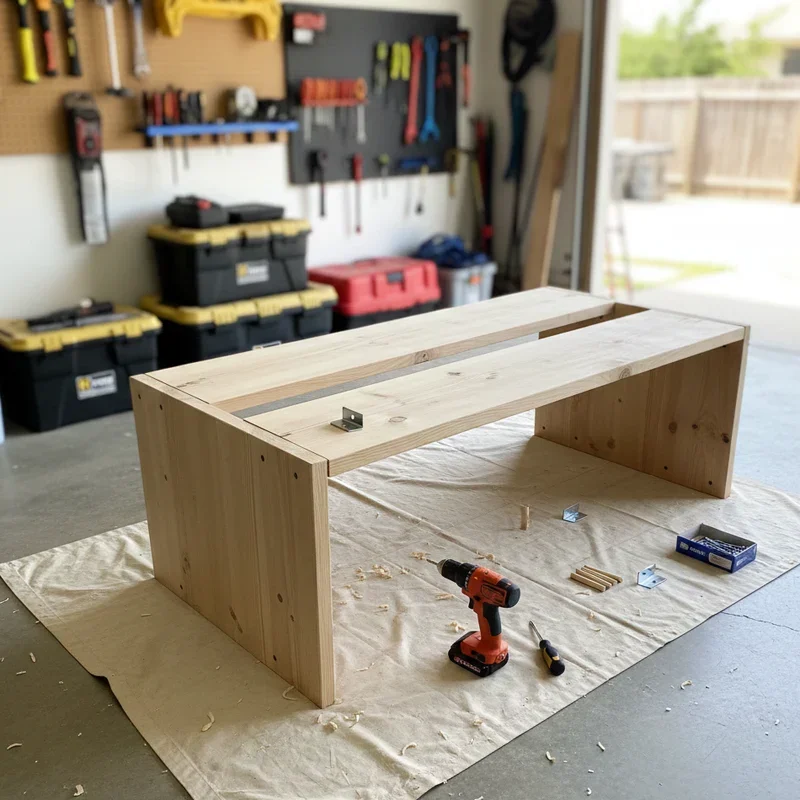
Step 4: Build the Base Frame
The base frame, often called the apron, provides structural support and connects the legs. Cut your apron pieces to length and drill pocket holes on the inside faces where they'll attach to the legs and desktop.
Attach the apron pieces to the legs using pocket screws and wood glue. Work on a flat surface to ensure everything stays square. Use your combination square frequently to check that all corners are at perfect 90-degree angles.
Step 5: Attach the Desktop
With your base frame assembled, flip it upside down and center your desktop on top (which is actually the bottom since everything's flipped). Use pocket screws through the apron into the desktop, or use figure-eight fasteners for a more refined approach that allows for wood movement.
Make sure you're not over-tightening screws, especially in softer woods. You want a snug connection without cracking the wood.
Step 6: Add Support and Stability
Depending on your desk size, you might need additional support. For desks longer than 48 inches, consider adding a center support rail or stretcher between the legs. This prevents the desktop from sagging over time, especially if you plan to load it up with heavy monitors and equipment.
If your desk feels wobbly, diagonal corner braces can add tremendous stability without being visible once the desk is in its final position.
Step 7: Apply Your Finish
This is where your desk transforms from a construction project into a piece of furniture. Sand everything one final time with 220-grit sandpaper and wipe away all dust with a tack cloth.
For finish options, consider:
Oil-Based Polyurethane: Durable and gives a warm amber tone to wood. Requires longer dry times between coats.
Water-Based Polyurethane: Dries clearer and faster. Less odor during application but may raise the wood grain slightly.
Danish Oil: Penetrates the wood and brings out beautiful grain patterns. Easier to apply but offers less surface protection.
Wax: Creates a lovely soft sheen but requires periodic reapplication.
Apply at least two to three coats of your chosen finish, sanding lightly with 320-grit between coats. This builds up protection and creates that glass-smooth surface you're after.
Smart Tips for a Professional Result
After walking through how to build a desk: tools, steps, and smart tips become even more valuable when you know these insider tricks that separate amateur builds from professional-looking results.
Cable Management Solutions
Nobody wants a beautiful desk covered in tangled cables. Plan for cable management from the start. Drill a hole near the back of the desktop and install a desk grommet. Consider routing a channel along the underside of the desktop using a router, or simply attach a wire basket beneath the desk surface.
Edge Treatment Options
The edges of your desktop deserve some attention. You can round them over with a router and roundover bit, chamfer them for a more modern look, or simply ease the sharp corners with sandpaper. Whatever you choose, consistent edge treatment throughout gives your desk a cohesive, intentional appearance.
Preventing Future Problems
Apply finish to all surfaces, including the underside of your desktop. This helps prevent moisture from entering unevenly, which causes warping. It's a step many beginners skip, but it makes a real difference in the long run.
Use furniture levelers on the bottom of your legs. Very few floors are perfectly level, and adjustable levelers ensure your desk sits solid without rocking.
Customization Ideas
Make your desk uniquely yours with some creative additions:
Install LED strip lighting underneath for ambient glow
Add a wireless charging pad flush with the desktop surface
Include a pull-out keyboard tray
Build in a hidden drawer beneath the desktop
Route a channel for holding pens and small items
Common Mistakes to Avoid
Even experienced woodworkers make mistakes sometimes. Here are pitfalls to watch out for:
Rushing the planning phase: Taking shortcuts early leads to problems later. Spend adequate time designing and measuring.
Ignoring wood grain direction: Grain should generally run lengthwise on your desktop for both appearance and strength.
Skipping the pilot holes: Without pilot holes, screws can split wood, especially near edges and in hardwoods.
Over-sanding: Aggressive sanding can create dips and uneven surfaces. Let the sandpaper do the work with light, consistent pressure.
Applying finish too thick: Multiple thin coats always look better than one thick coat, which tends to run, drip, and take forever to dry.
Conclusion
Building your own desk is one of those projects that delivers satisfaction far beyond the finished product. You've learned new skills, created something functional with your own hands, and probably saved a decent chunk of money compared to buying something similar. The desk you've built will serve you for years, maybe even decades, and every time you sit down to work, you'll feel that quiet pride of accomplishment. Whether this was your first woodworking project or one of many, you've proven that with the right guidance on how to build a desk: tools, steps, and smart tips, anyone can create something beautiful and practical.
Read next: How to Install a Door Knob: A Step-by-Step Guide
Frequently Asked Questions
1. How much does it cost to build a desk yourself?
Building a basic desk typically costs between $75 and $200 depending on wood choices.
2. What is the easiest desk design for beginners?
A simple farmhouse desk with four legs and an apron is beginner-friendly.
3. How long does it take to build a desk?
Most simple desks can be completed in one to two weekends of work.
4. Do I need expensive tools to build a desk?
No, basic power tools and hand tools are sufficient for most desk projects.
5. What wood is best for a desk that will last?
Hardwoods like oak, maple, or walnut offer excellent durability and timeless beauty.
Stay up to date with our latest ideas!