How to Polish Concrete: Step-by-Step Guide for Beginners
Master how to polish concrete with our beginner-friendly step-by-step guide. Learn techniques, tools, and tips for beautiful glossy floors.
Walk into any trendy coffee shop, modern office building, or contemporary home these days, and chances are you'll be walking on polished concrete. This sleek, sophisticated flooring option has exploded in popularity, and honestly, it's not hard to see why! The glossy sheen, durability, and low maintenance requirements make polished concrete a no-brainer for anyone tired of dealing with finicky floor coverings.
But here's what might surprise you: that gorgeous, mirror-like finish isn't created by applying some magical coating or installing special tiles. Nope! Polished concrete is exactly what it sounds like: regular concrete that's been ground, honed, and polished until it shines like a new penny. The process essentially transforms an ordinary gray slab into something genuinely stunning.
Now, I won't pretend this is the easiest DIY project you'll ever tackle. Polishing concrete requires specialized equipment, patience, and a methodical approach that can feel tedious to folks who prefer quick wins. But for beginners willing to learn the process and put in the effort, the results are absolutely worth it. We're talking floors that last decades with minimal upkeep!
This comprehensive How to Polish Concrete: Step-by-Step Guide for Beginners covers everything from assessing your existing slab to achieving that coveted high-gloss finish. Whether you're renovating your garage, finishing a basement, or updating a commercial space, we've got you covered. Ready to turn that dull concrete into a showstopper? Let's get grinding!
Understanding Polished Concrete Basics
What Makes Concrete Polishable
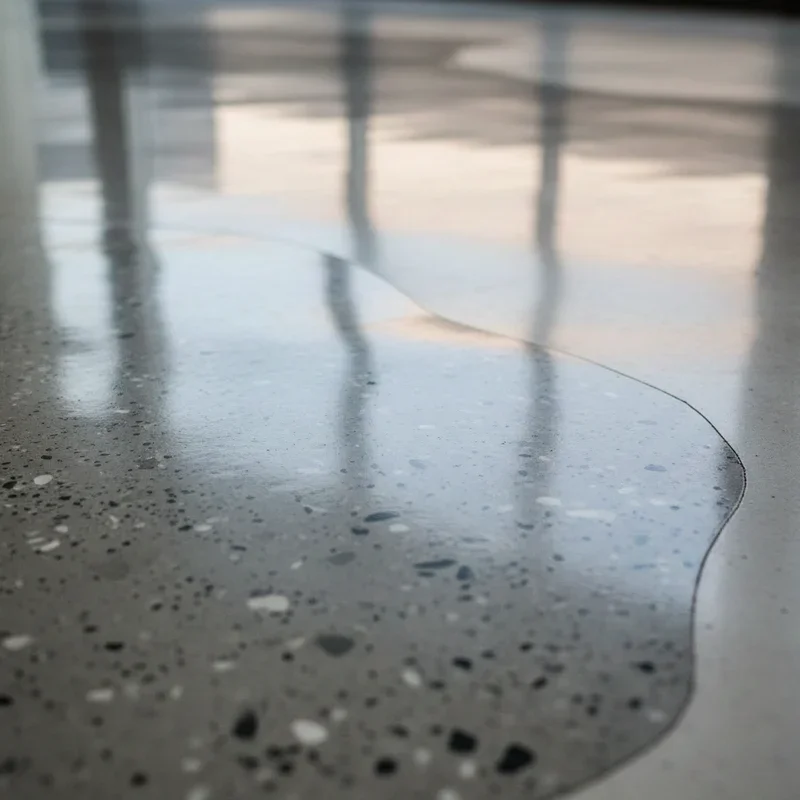
Not every concrete slab is a good candidate for polishing, so understanding what you're working with matters enormously. Concrete consists of cement paste binding together aggregate materials like gravel, sand, and crusite. When polished, this aggregate becomes exposed and contributes significantly to the final appearance.
The quality and type of aggregate in your existing concrete affects the finished look dramatically. Slabs with attractive stones create visual interest and depth. Those with predominantly sand or small pebbles produce a more uniform, terrazzo-like appearance. Neither is better or worse, just different aesthetic outcomes to consider.
Concrete age and condition also factor into polishability. Freshly poured concrete should cure for at least 28 days before polishing, though waiting longer produces better results. Older concrete works fine for polishing, provided it's structurally sound without major cracking, spalling, or contamination issues.
The Science Behind the Shine
Here's a quick science lesson that explains why polishing works! Concrete's surface contains microscopic peaks and valleys that scatter light in every direction, creating that familiar matte, chalky appearance. Polishing progressively flattens these irregularities until the surface becomes smooth enough to reflect light uniformly.
The process uses increasingly finer abrasives, similar to sanding wood before finishing. Each grinding step removes scratches from the previous step while creating finer scratches of its own. Eventually, scratches become so fine that the human eye perceives a smooth, reflective surface.
Chemical densifiers applied during polishing penetrate the concrete and react with calcium compounds to create harder, denser surface material. This densification process is crucial for achieving maximum shine and durability because untreated concrete simply can't hold a polish effectively.
Assessing Your Concrete Slab
Evaluating Current Condition
Before investing in equipment rentals or purchasing supplies, carefully evaluate your concrete's condition. This assessment determines whether polishing makes sense for your particular slab and helps identify any repairs needed before beginning.
Look for cracks, which fall into two categories: cosmetic and structural. Hairline cracks typically pose no problem and may even disappear during grinding. Wider cracks or those showing vertical displacement indicate structural issues requiring professional assessment before proceeding.
Check for spalling, the flaking or peeling of concrete surfaces. Minor spalling can sometimes be addressed during preparation, but extensive damage may require patching or complete resurfacing before polishing becomes feasible.
Test for moisture issues by taping plastic sheeting to the concrete and checking after 24 hours. Condensation under the plastic indicates moisture migration that could cause problems with densifiers and sealers. Moisture issues need addressing before polishing.
Identifying Previous Coatings
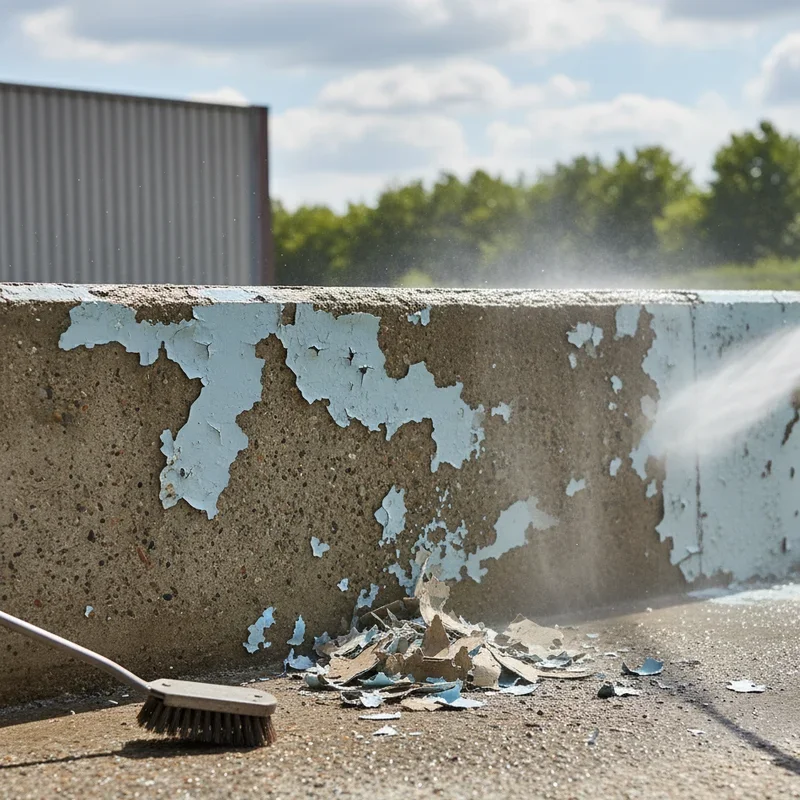
Many concrete floors have been painted, sealed, or coated at some point. These existing treatments must be removed before polishing can occur because diamond tooling can't effectively work through most coatings.
Perform a simple water test: sprinkle water on the concrete surface. If water beads up rather than absorbing, some type of coating or sealer is present. Extensive coating removal adds significant time and effort to your project.
Epoxy, paint, and acrylic sealers require aggressive grinding with metal-bonded diamond tooling to remove. This preparation work creates substantial dust and debris, so plan accordingly.
Essential Equipment and Materials
Grinding and Polishing Machines
The concrete grinder is your primary tool for this project, and quality matters tremendously. These machines use rotating discs embedded with diamond abrasives to progressively smooth concrete surfaces.
Walk-behind grinders suitable for DIY projects typically range from 110-volt machines handling small areas to 220-volt models capable of tackling larger spaces more efficiently. Rental availability varies by location, so check with equipment rental centers in your area.
Planetary grinders feature multiple rotating heads that spin in opposite directions, creating smoother, more consistent results than single-head machines. They cost more to rent but produce noticeably better outcomes.
Edge grinders handle areas the main machine can't reach, particularly along walls and around obstacles. Most projects require both a main grinder and an edge grinder for complete coverage.
Diamond Tooling
Diamond tooling does the actual cutting and polishing work, and understanding the grit progression is absolutely essential. You'll need multiple sets of diamonds, progressing from coarse to fine through many steps.
Metal-bonded diamonds handle initial grinding and coating removal. These aggressive tools cut quickly through concrete and any contaminants but leave visible scratch patterns.
Resin-bonded diamonds take over for honing and polishing stages. These finer tools progressively refine the surface, with each grit level removing scratches from the previous step.
Typical grit progressions run something like: 30 or 50 grit for initial grinding, then 100, 200, 400, 800, 1500, and 3000 grit for polishing. Some projects may require additional intermediate steps depending on desired finish level.
Chemical Products
Densifiers penetrate concrete pores and react chemically to harden the surface. Apply these products between grinding and polishing stages for optimal results.
Lithium silicate densifiers work faster and penetrate deeper than older sodium or potassium silicate formulas. Most professionals now prefer lithium-based products for their superior performance.
Guard products or sealers applied after polishing enhance stain resistance and make maintenance easier. Choose products specifically designed for polished concrete rather than generic concrete sealers.
How to Polish Concrete: Step-by-Step Guide for Beginners in Action
Preparation and Initial Grinding
Clear the work area completely, removing all furniture, equipment, and debris. Cover anything that can't be removed because concrete grinding creates impressive amounts of dust despite vacuum attachments.
Connect your grinder to a dust collection system or shop vacuum rated for concrete dust. These fine particles create respiratory hazards and make cleanup nightmarish without proper containment.
Begin with the coarsest diamonds appropriate for your situation. For slabs in reasonably good condition, 50 or 80 grit might work as a starting point. Heavily contaminated or coated floors may require starting at 30 grit.
Work in overlapping passes, maintaining consistent speed and pressure. Rushing creates uneven results, while dwelling too long in one spot can create low spots or burn marks. Find a steady rhythm and stick with it.
Edge areas require switching to your smaller edge grinder. Try to blend edge work with field work so transitions aren't visible in the finished floor.
Grinding Through the Grits
After completing the initial grinding pass, vacuum thoroughly and inspect your results. You should see a uniformly scratched surface with consistent exposure of aggregate throughout.
Progress to the next grit level, typically doubling the number each time through the lower grits. So from 50 grit you'd move to 100 grit, then 200, and so on.
Each subsequent pass should remove scratches from the previous pass while creating finer scratches of its own. If you still see coarse scratches after grinding with finer diamonds, go back and repeat the previous step more thoroughly.
Continue grinding through 100 and 200 grit, vacuuming between each pass. By this point, your concrete should look noticeably smoother and cleaner, though not yet shiny.
Applying Densifier
After completing grinding through approximately 200 grit, it's time for densifier application. This crucial step transforms ordinary concrete into a surface capable of accepting and holding a polish.
Apply densifier using a pump sprayer, mop, or microfiber applicator, depending on manufacturer recommendations. Coverage rates vary by product, so follow label directions carefully.
Keep the concrete wet with densifier for the time specified, typically 15 to 30 minutes. Don't let it dry completely on the surface because dried residue creates problems during subsequent polishing.
Scrub the surface with a floor scrubbing machine or deck brush to work the densifier into the concrete pores. Remove excess with a wet vacuum or mops before it dries.
Allow the densifier to cure according to manufacturer specifications before continuing with polishing. Rushing this step compromises final results.
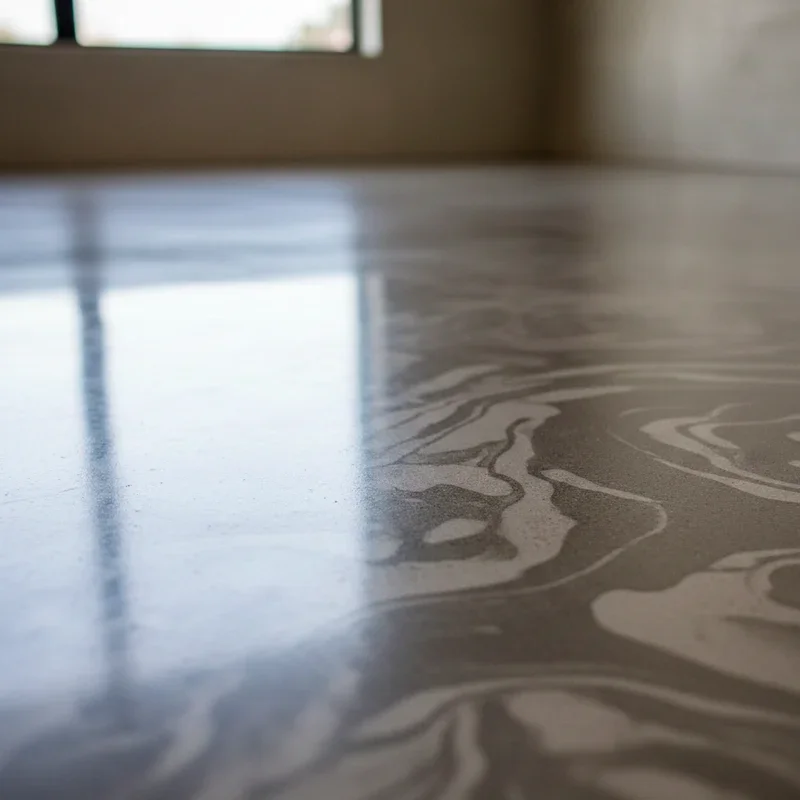
Polishing to Final Finish
After densifier has cured, resume the grinding process with the next grit level, typically 400 for resin-bonded diamond pads. These polishing pads begin developing actual shine rather than just removing scratches.
Continue progressing through grits: 800, 1500, and 3000 for a high-gloss finish. Some applications stop at 800 for a satin finish or 1500 for a medium gloss, depending on desired appearance.
Each polishing pass should noticeably increase shine. If shine isn't developing as expected, the densifier may not have penetrated adequately, or previous grinding steps may have been insufficient.
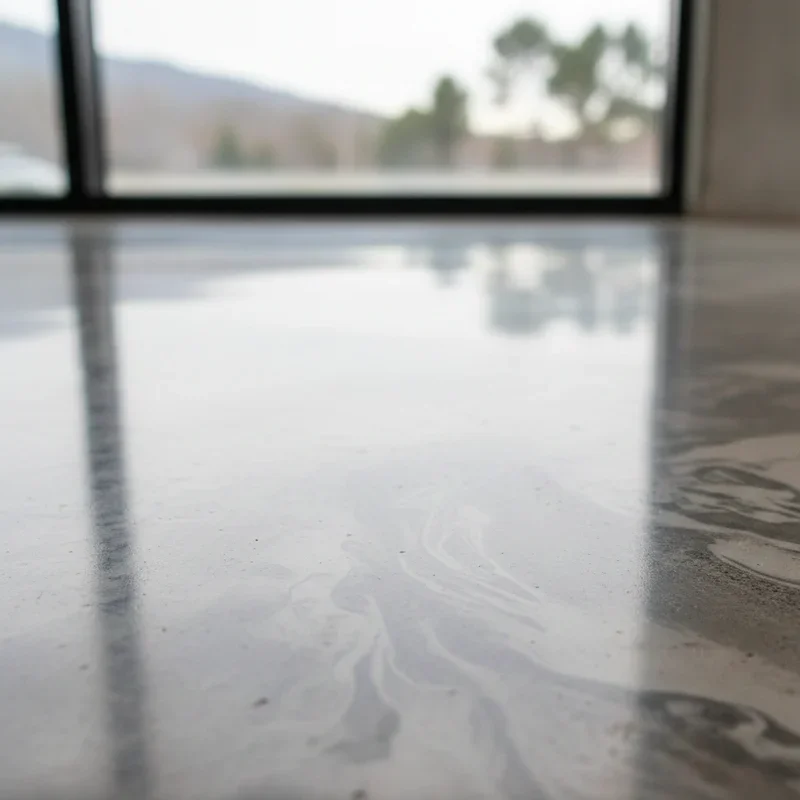
The final pass with 3000 grit creates that coveted mirror-like finish when everything has been done correctly. Take your time with this step because it determines the ultimate appearance of your floor.
Final Protective Treatment
Apply a guard or protective sealer after polishing completes. These products enhance stain resistance and make ongoing maintenance easier without significantly altering appearance.
Apply according to manufacturer directions, typically using a microfiber applicator in thin, even coats. Multiple light coats produce better results than single heavy applications.
Allow adequate curing time before returning the floor to service. Most products require 24 to 48 hours before foot traffic and several days before rolling loads.
Common Beginner Mistakes to Avoid
Skipping Grit Levels
Trying to save time by skipping grit levels almost always backfires! Each grit level removes specific scratch patterns and prepares the surface for the next step. Jumping from 100 grit directly to 400 grit, for example, leaves scratches that finer grits simply cannot remove efficiently.
If you notice stubborn scratch patterns persisting into higher grits, you've likely skipped steps or moved through previous grits too quickly. Going back is tedious but necessary for quality results.
Insufficient Densifier Penetration
Densifier needs adequate time to penetrate and react with concrete chemistry. Rushing this step or applying insufficient product leaves you with a surface that won't hold a polish regardless of how much time you spend grinding.
Apply generous quantities and keep the surface wet throughout the recommended contact time. Better to use too much densifier than too little!
Uneven Pressure and Coverage
Inconsistent grinding pressure creates high and low spots that become more visible as shine develops. Maintaining steady, uniform pressure throughout each pass requires attention and practice.
Similarly, missing areas or overlapping too much creates visible patterns in the finished floor. Develop a systematic approach to coverage and stick with it throughout the project.

Maintenance After Polishing
Daily and Weekly Care
Polished concrete is remarkably easy to maintain, which is one of its major selling points! Daily dust mopping removes abrasive particles that could scratch the surface over time.
Weekly damp mopping with a pH-neutral cleaner keeps floors looking fresh without damaging the polish or protective treatments. Avoid acidic cleaners that can etch the surface and harsh chemicals that might strip protective coatings.
Periodic Maintenance
Despite their durability, polished concrete floors benefit from periodic burnishing to maintain maximum shine. Floor burnishing machines with appropriate pads restore luster that daily traffic gradually diminishes.
Reapply guard products annually or as needed based on traffic levels and exposure. High-traffic areas may require more frequent attention than residential spaces.
Conclusion
Polishing concrete transforms ordinary gray slabs into stunning, durable floors that rival any traditional flooring option in appearance while exceeding most in longevity and ease of maintenance. This How to Polish Concrete: Step-by-Step Guide for Beginners has walked you through every phase from initial assessment through final protective treatments. Remember that patience and proper progression through grit levels matter far more than rushing to finish quickly. Take your time with densifier application and don't skip steps in the grinding sequence. The results reward your diligence with floors that will impress visitors and serve beautifully for decades with minimal ongoing maintenance requirements.
Read next: How to Use a Grounding Mat in Bed for Better Sleep
Frequently Asked Questions
1. How long does it take to polish a concrete floor?
Small residential spaces take two to three days; larger areas require proportionally more time.
2. Can I polish concrete floors that have been painted?
Yes, but paint must be completely removed through aggressive grinding before polishing begins.
3. What grit level produces a high-gloss polished concrete finish?
High-gloss finishes typically require progressing through 1500 to 3000 grit polishing pads.
4. Is polished concrete slippery when wet?
Polished concrete has similar slip resistance to other hard flooring; texturing options exist.
5. How often does polished concrete need to be repolished?
Properly maintained polished concrete rarely needs repolishing for 10 to 20 years or longer.
Stay up to date with our latest ideas!