How to Fix a Hole in a Door Without Replacing It
Learn how to fix a hole in a door without replacing it. Simple DIY methods for wood, hollow, and solid doors using common household materials.

Well, here's a situation we've all faced at some point. You're staring at an unsightly hole in your door, and your mind starts racing about replacement costs and contractor fees. But hold on! Before you empty your wallet or start browsing for new doors online, I've got some fantastic news for you. Most door damage is totally fixable with some basic materials and a little elbow grease.
Whether that hole came from an overenthusiastic doorknob, an accidental mishap, or your kid's indoor baseball practice gone wrong, you don't need to be a master carpenter to tackle this problem. In fact, learning how to fix a hole in a door without replacing it can save you hundreds of dollars and give you serious DIY bragging rights. Throughout this guide, I'll walk you through several proven methods that work on different door types, from hollow-core to solid wood. Ready? Let's dive in and get that door looking brand new again!
Understanding Your Door Type Before Starting Repairs
Look, not all doors are created equal, and that's actually pretty important when you're planning your repair strategy. You wouldn't use the same approach to fix a paper cut and a deep gash, right? Same principle applies here.
Hollow-Core Doors
These are the lightweight champions you'll find in most modern homes, especially for interior rooms. They've got a cardboard honeycomb structure inside with thin wood veneer on the outside. They're budget-friendly but, honestly, pretty easy to damage. The good news? They're also super easy to repair!
Solid Wood Doors
Now we're talking about the heavy hitters. These doors are exactly what they sound like—solid wood through and through. They're durable, beautiful, and when damaged, they actually hold filler materials really well. You'll typically see these as exterior doors or in older, more traditional homes.
Hollow Metal Doors
These industrial-style doors are common in apartments and commercial spaces. They're tougher to damage in the first place, but when they do get dinged up, the repair process differs quite a bit from wood doors.
Gathering Your Materials and Tools
Before you roll up your sleeves, let's make sure you've got everything you need. There's nothing worse than getting halfway through a project and realizing you're missing a crucial item!
Essential Materials You'll Need
Wood filler or spackling compound
Sandpaper (various grits: 80, 120, and 220)
Primer paint
Matching paint for your door
Mesh patch or screen material (for larger holes)
Newspaper or cardboard pieces
Painter's tape
Drop cloth or old newspapers
Tools That'll Make Your Life Easier
Putty knife or scraper
Utility knife
Paintbrushes or foam brushes
Mixing container for filler
Clean rags
Optional: power sander for faster results
How to Fix Small Holes in Your Door
Alright, let's start with the easy stuff. Small holes—we're talking anything under half an inch—are honestly a piece of cake to fix.
Step-by-Step Process for Minor Damage
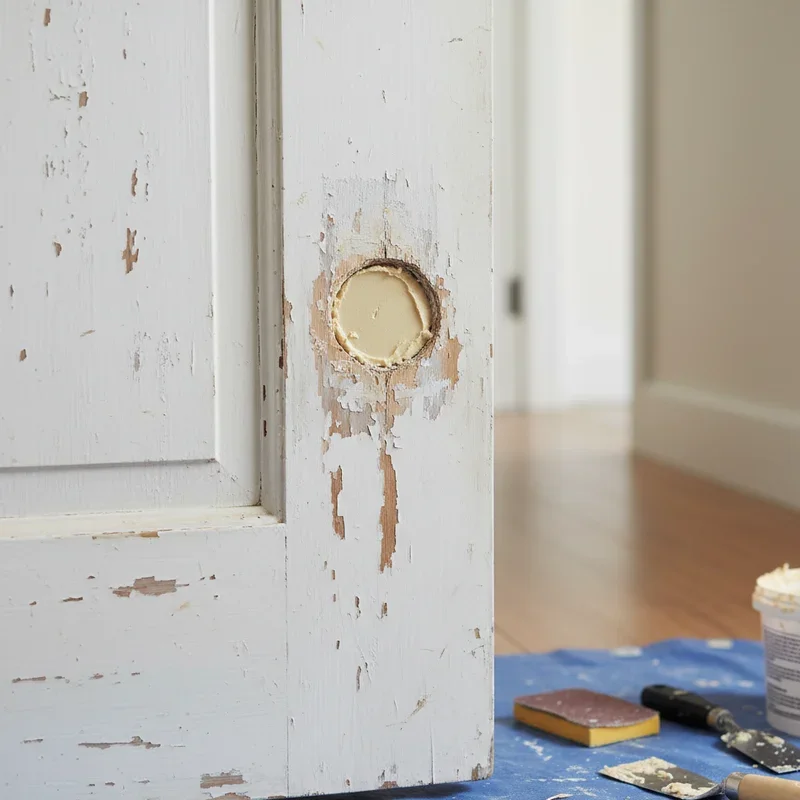
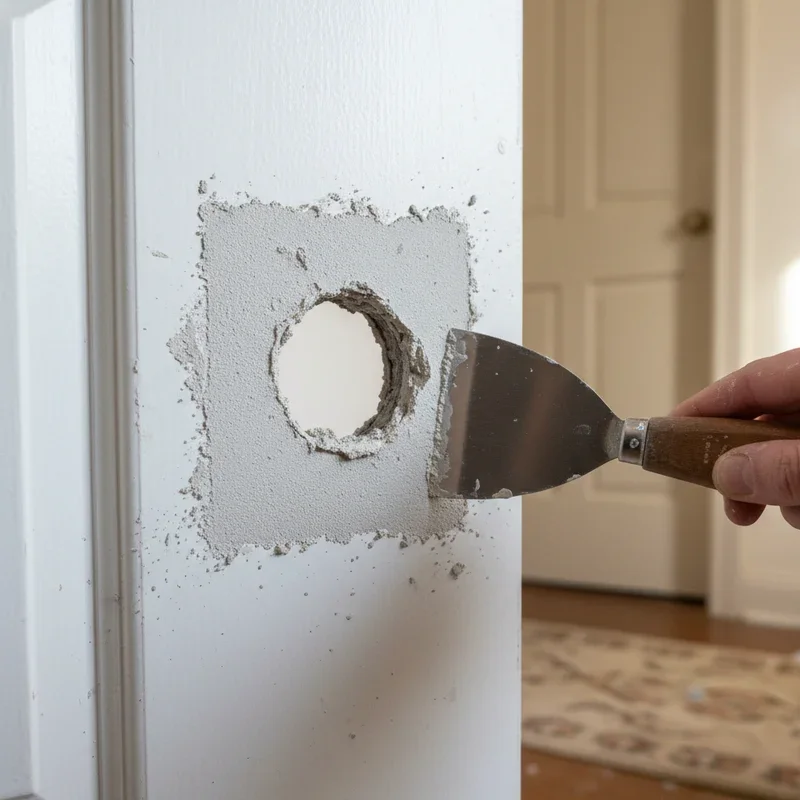
First things first, clean the area around the hole. You'd be surprised how much dust and debris can accumulate around damaged areas. Use a slightly damp cloth and let it dry completely.
Next up, grab your wood filler. Here's a pro tip: choose a filler that's slightly lighter than your door's color. You can always darken it with stain or paint later, but lightening a too-dark patch is basically impossible.
Apply the filler with your putty knife, pressing it firmly into the hole. Don't be shy about overfilling slightly—the filler will shrink as it dries, and you want it proud of the surface. Let it dry according to the manufacturer's instructions. This usually takes anywhere from 30 minutes to a few hours.
Once it's completely dry, sand it smooth using progressively finer grits of sandpaper. Start with 80-grit to knock down the high spots, move to 120-grit for smoothing, and finish with 220-grit for that buttery-smooth feel. Your fingers are excellent quality-control tools here—run them over the patch to check for any bumps or depressions.
Prime the patched area, let it dry, then paint to match. You might need a couple of coats to get perfect color matching. Patience is key!
Repairing Medium-Sized Holes Like a Pro
Medium holes, roughly half an inch to two inches, need a bit more attention. But don't worry—you've totally got this.
The Mesh Patch Method
This technique works wonderfully for holes that are too big for filler alone but don't require major reconstruction. Think of it like putting a Band-Aid on a wound, except way more permanent.
Cut a piece of mesh patch or aluminum screen that's larger than your hole by at least an inch on all sides. Push it into the hole and secure it by applying a thin layer of wood filler around the edges. The mesh provides structure and prevents your filler from just falling through into the hollow cavity.
Let that initial layer dry completely. This is crucial—rushing this step will ruin everything. Once dry, apply another layer of filler over the entire mesh, building it up gradually. Multiple thin layers work way better than one thick glob. Trust me on this.
After the final layer dries, sand it smooth using the same progression I mentioned earlier. The goal is making the repair invisible, and proper sanding is what separates amateur patches from professional-looking results.
The Cardboard Insert Technique
Here's another clever approach that works great for hollow-core doors. Cut a piece of cardboard slightly larger than your hole. Thread a piece of string through the center of the cardboard, then fold the cardboard and insert it through the hole. Once inside, the cardboard will unfold. Pull the string taut to hold the cardboard flush against the inside of the door.
While holding tension on the string, fill the hole with wood filler or expanding foam. Keep the string taut until the filler sets enough to hold the cardboard in place. Once secure, cut the string flush and finish filling the hole. Sand, prime, and paint as usual.
Tackling Large Holes and Serious Damage
Okay, so you've got a substantial hole—maybe three inches or bigger. This is where how to fix a hole in a door without replacing it becomes a bit more involved, but it's still totally doable!
The Wooden Dowel Method for Solid Doors
For solid wood doors with large holes, dowels are your best friend. Measure the hole's depth and diameter. Get a wooden dowel that fits snugly into the hole—you might need to drill out the hole slightly to accommodate a standard dowel size.
Apply wood glue to the dowel and tap it into the hole using a hammer. Let the glue dry overnight. Cut the dowel flush with the door surface using a handsaw, then sand the area smooth. Fill any gaps around the dowel with wood filler, sand again, and finish with primer and paint.
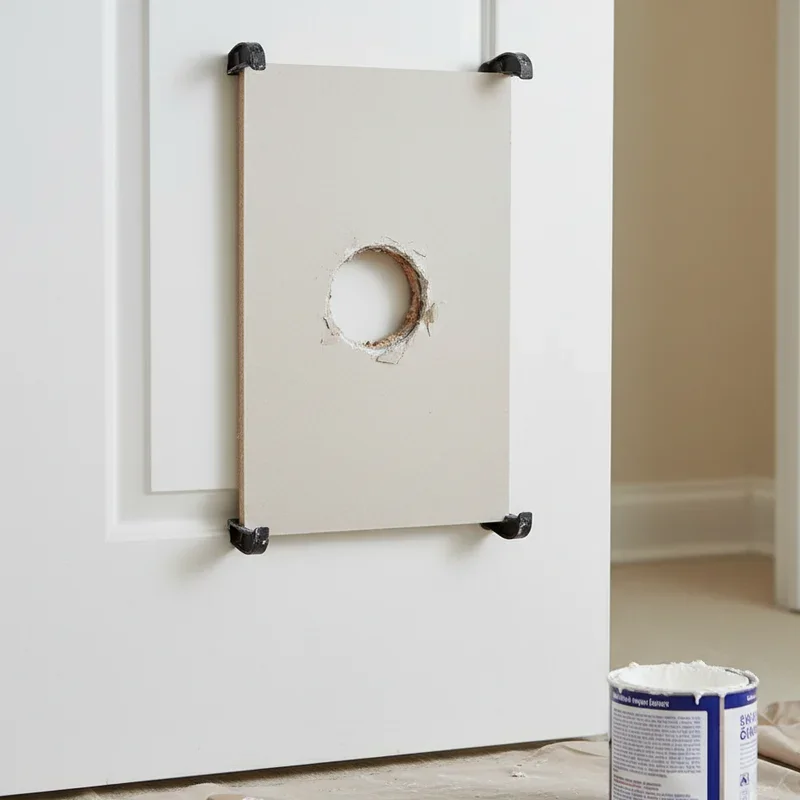
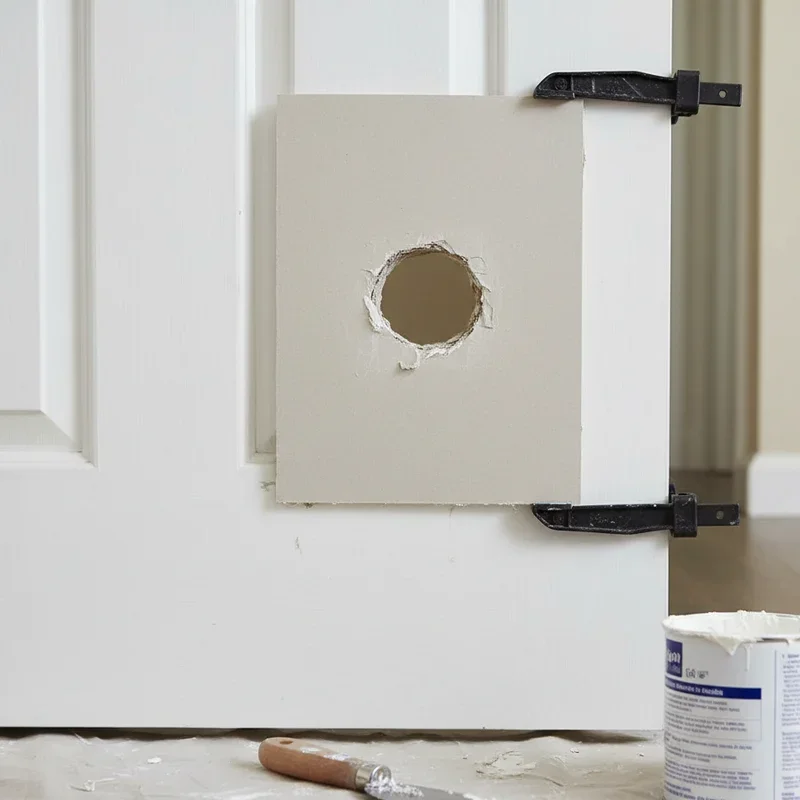
The Backer Board Solution for Hollow Doors
Large holes in hollow-core doors require creating a solid backing. Cut a piece of thin plywood or sturdy cardboard larger than the hole. Attach strings to the corners of this backer board. Insert it through the hole, position it behind the opening, and pull the strings to hold it tight against the inner surface.
Secure the backer board by applying construction adhesive around the hole's edges, then hold the strings taut while the adhesive sets. Once secure, cut the strings and fill the cavity with expanding foam insulation. Let it cure, then trim the excess foam flush with the door surface.
Cover the foam with a layer of wood filler or joint compound, building it up to match the door's surface. Sand thoroughly, prime, and paint. The repair should be rock solid and completely invisible when done properly.
Advanced Tips for Professional-Looking Results
Want your repair to be completely undetectable? These insider tricks will take your work from "good enough" to "wow, where was the hole?"
Color Matching Like a Boss
Paint matching can be tricky, especially with older doors that have faded over time. If possible, take a small chip of paint from an inconspicuous area to a paint store for computer matching. Alternatively, you can paint the entire door for a fresh, uniform appearance. Sometimes this is easier than trying to match a specific spot perfectly.
Texture Replication Techniques
Many doors have a wood grain texture that you'll need to replicate for invisible repairs. Before the final filler coat dries completely, use a wood graining tool or even a stiff brush to create texture that matches the surrounding area. Practice on scrap material first—this takes a steady hand and some finesse.
For painted doors with slight texture, you can add a tiny bit of fine sand to your final paint coat. Mix thoroughly and test on cardboard before applying to your repair.
The Feathering Technique
When sanding your repair, don't just focus on the patched area. Feather the edges by sanding slightly beyond the repair zone. This creates a gradual transition rather than an obvious boundary between old and new material. Your patch will blend seamlessly into the surrounding surface.
Common Mistakes to Avoid During Door Repairs
Let me save you from the headaches I've experienced over the years. These mistakes are super common, but they're also completely avoidable.
Rushing the Drying Process
I get it—you want your door fixed yesterday. But applying the next layer before the previous one has fully cured is asking for trouble. The patch will crack, shrink unevenly, or fail completely. Just wait. Watch a movie, grab some coffee, be patient. Your future self will thank you.
Using the Wrong Filler Type
Not all fillers are created equal. Spackling compound works great for drywall but shrinks considerably in deep holes. Two-part wood fillers are incredibly strong but have limited working time. Expanding foam is fantastic for filling large voids but requires careful trimming. Match your filler to your specific repair needs.
Inadequate Surface Preparation
Skipping the cleaning step or not removing loose material around the hole will compromise adhesion. Your beautiful repair will eventually pop out, and you'll be back to square one. Clean thoroughly, remove any splinters or loose veneer, and ensure the surface is dry before applying any filler.
Over-Sanding the Surrounding Area
Getting carried away with sandpaper can damage the door's finish around your repair. Use gentle pressure and check your progress frequently. It's easier to sand a bit more than to fix damage from over-sanding.
When to Consider Professional Help
Look, I'm all about DIY solutions, but sometimes calling in a pro makes sense. If your door frame is damaged, if there's structural damage affecting the door's function, or if you've got a valuable antique door, professional restoration might be worth the investment.
Similarly, if you've attempted a repair and it's not holding up, a professional can assess whether there's an underlying issue you're missing. There's no shame in recognizing when a project is beyond your skill level or available time.
Maintaining Your Repaired Door
Once you've successfully completed your repair, a little maintenance goes a long way toward preventing future damage.
Install door stops to prevent doorknobs from punching through walls or doors. Teach household members (especially kids!) to close doors gently. Regularly inspect high-traffic doors for early signs of wear and address small issues before they become major problems.
Consider adding a clear protective coating to areas that get frequent contact. A couple of coats of polyurethane on a hollow-core door's vulnerable spots can prevent future holes entirely.
Cost Comparison: Repair vs. Replacement
Let's talk money for a second. How to fix a hole in a door without replacing it isn't just about skill—it's about serious savings too.
A basic hollow-core interior door costs between $50-$150, plus installation fees that can run another $100-$200. Solid wood doors? You're looking at $200-$500 or more, with similar installation costs.
Your repair materials? Probably $15-$30 total. Wood filler, sandpaper, a bit of paint—that's it. Even if you need to buy a few tools you don't already own, you'll still come out way ahead financially. Plus, you've gained valuable skills and saved a perfectly good door from the landfill. That's a win-win-win situation right there.
Environmental Benefits of Repairing Over Replacing
Beyond the financial savings, there's something genuinely satisfying about keeping materials out of landfills. The construction industry generates massive amounts of waste, and every door we repair instead of replace makes a small but meaningful difference.
Older doors, particularly solid wood ones, were often made from old-growth timber that's simply not available anymore. Preserving these doors maintains both their quality and their history. There's real value in that.
Preventive Measures for Future Protection
Once you've gone through the effort of fixing your door, you'll definitely want to prevent repeat damage. Install quality door stops—they're inexpensive and incredibly effective. Consider adding protective plates or guards to areas that take repeated impacts.
For homes with pets, scratch guards near the bottom of doors can prevent damage from eager dogs. If you've got kids, those foam bumpers meant for furniture corners work great on doorknobs too.
Teaching proper door usage might seem basic, but it's genuinely effective. Explain to family members why slamming doors or being rough with them causes damage. Sometimes awareness is all it takes to change behavior.
Conclusion
Fixing a hole in your door is absolutely achievable, regardless of your experience level. With the right materials, some patience, and the techniques outlined above, you can restore your door to like-new condition without breaking the bank. Whether you're dealing with a tiny ding or a substantial hole, there's a repair method that'll work for your situation. Remember, take your time, don't rush the drying process, and sand thoroughly for professional results. You've got this!
Read next: How to Lubricate a Sliding Glass Door for Smooth Use
Frequently Asked Questions
1. Can I use regular spackle instead of wood filler for door repairs?
Spackle works for small holes but shrinks significantly, making wood filler better for doors.
2. How long should I wait between applying coats of filler?
Wait at least two hours between coats, or follow the manufacturer's recommended drying time carefully.
3. Will my repair be visible after painting the patched area?
Proper sanding and priming make repairs nearly invisible, especially when the entire door is repainted.
4. Can I fix holes in metal doors using these same methods?
Metal doors require auto body filler instead of wood filler for proper adhesion and durability.
5. Do I need to remove the door from its hinges for repairs?
Small repairs can be done with the door hung, but removing it makes sanding easier.
Stay up to date with our latest ideas!